Friday 28 March 2014

Grilled Chicken in a Yummy Spring Onion Marinade

Going on a diet once in a while is good for the body. Not just for losing weight, but also to get a hold over your diet and your cravings. While it is always advisable to maintain and lead a healthy diet and lifestyle, a strict diet regime builds in a sense of self control into your personality and that helps you maintain the healthy diet even after the regime is over. In India, there is a festival called Navratri where they worship Goddess Durga and remain on fast for whole 9 days. That is also a diet in modern language. The point being that going on a diet is not a modern day theory but, instead, has been passed on to us by our ancestors. They did it for religious purpose while we give it the shape of a weight loss program. Both the regimes put restrictions on our regular food habits and teach us self control. Coming to today's recipe, it is the Day 5 of my GM Diet and is a meat only day. While there is also a vegetarian version of this day, which I am not aware of, the thought of chicken after 4 long days is quite a bit of a thrill. So I decided to give it a nice yummy twist and prepared this no oil delicious grilled chicken. The marinade can be prepared in just under 10 minutes and grilling it in the oven for 30 minutes while turning in between gives it the desired touch. 

Ingredients
500 gms chicken (preferably with bones)
4 stalks of spring onion with whites intact
1 tbsp ginger chopped
2-3 pods of garlic, chopped
1/2 tsp red chilli flakes
Juice of 1 lemon
1 tsp cumin powder
1 tsp coriander powder
1 tsp red chilli powder (optional)
Salt to taste

Direction
In a blender, make a paste with the spring onions, ginger, and garlic with a dash of water as required. 
Wash and cut the chicken and put it in a non metallic container. Add the marinade and all other ingredients and mix well. Make slits on the chicken so that the marinade is absorbed well. Cover and marinate the chicken for at least 4-5 hours or for best results, overnight. 
Pre-heat the oven at 225 degree celsius in the broil mode (top rod only). Now line the baking tray with an aluminium foil and grill the chicken for 25-30 minutes turning in between for uniform roasting. The time required may change as per the oven make. You can start with 20 minutes and then turn it once and do it for another 10-15 minutes depending on how well the chicken has browned. Serve with chopped onions and spring onion greens and any salad of your choice.


Thursday 27 March 2014

The Wonder Cabbage Soup

This cabbage soup is considered to be a faithful friend of the weight watchers and can be had in unlimited quantity any time of the day and as many times as you want. Whether on a diet or not, you can relish this wonderful soup without any guilt at all and feel satisfied as well. I have added some spices to it to suit the tastebuds and to brighten up my otherwise bland diet. The changes make it even more delicious and it is going to be included in my weekly menu as well even after the diet regime is over. 

Ingredients
1/2 head of a medium cabbage chopped
1/2 carrot, chopped
1 small tomato, chopped
3 stalks of celery chopped
1 green capsicum
1 medium onion chopped
2 cloves garlic chopped
1 tsp olive oil
1 tsp dried basil
1 tsp dried oregano
Pinch of red chilli flakes
Pinch of black pepper powder
4 cups chicken stock (I used fat free one)

Direction
To give a twist to the original recipe, I roasted the bell pepper by rubbing a little olive oil on the pepper and roasted on the stove till the outer skin is black and charred. Once roasting is completed, cover the pepper in an airtight vessel or with a foil to ensure the steam does not escape and you can remove the skin easily when the pepper cools down. You can skip this step and use the pepper as is if running short of time. Once the roasted pepper cools down, gently rub the body with your hands and rub off the black skin. Then remove the seeds and chop the pepper.
In a deep bottomed vessel, add the olive oil and fry the onions, garlic, and celery till onions are pink. Now add the rest of the veggies including the chopped roasted pepper and the chicken stock. Cover and simmer the heat and cook till the veggies are tender. Now add the dry spices and remove from heat. Cool down and blend the soup for one pulse. You can again skip this step if you like chunky soup. I like mine blended and so followed up with the blender. Warm up the blended soup every time you serve. 


Tuesday 25 March 2014

Healthy Broccoli Soup

GM Diet has been going quite good for me till now although the same cannot be said for my husband who is quite sloshed already by the end of Day 2. I guess it is not easy to maintain a high pressure job and a rigorous diet at the same time. While I do have a lot of physical exertion, but I get to rest for about 2 hours in the afternoon while my baby sleeps which helps me get my energy back. This is my first time ever with such a strict diet regime and I am quite happy with the results. Many people complain that you tend to gain back whatever weight you lose in just a few days and then all the effort goes waste. However, I feel that if you maintain a healthy diet and an active lifestyle, you can still manage to retain the loss and maybe loose a few kilos more. My purpose of going on the diet was simply to loose some quick kilos and then follow a healthy diet to retain and maintain the loss. After all, it simply depends on how controlled you are over your diet and cravings. Whether I achieve my target weight is something to wait and see, but one thing which I have gained through this diet regime is self control and I am sure this gain will help me keep the scales under check. Today's recipe is a healthy yet filling and super yummy broccoli soup. I did cheat on the plan by adding a few ingredients which were not allowed for the day, but since the ingredients were not too high on calories, I decided to add them anyway.

Ingredients
4 cups (about 450 gms) broccoli florets
1 medium onion, chopped
1 stalk celery chopped
1 medium potato chopped
200 ml skimmed low fat milk
250 ml chicken broth (I used 99% low fat)
A pinch of red chilli flakes
Salt as per taste
1/2 tsp garlic powder
1 tsp olive oil

Direction
Heat oil in a deep bottomed vessel and fry the onions and celery until onions turn pink. Now add the potatoes and broccoli followed by the broth and milk. Add the red chilli flakes. You can add an additional 1/2 cup water as it will reduce while boiling. Simmer and cook the veggies in the broth for about 20 minutes or until tender. You and cook with a lid for a faster process but keep checking in between to ensure the liquid does not overflow. Remove from heat and cool it down. With a hand blender or a juicer jar, blend the veggies along with the broth. Return to the pan and warm it. Add salt and garlic powder and stir. Serve hot with your choice of bread.


Monday 24 March 2014

Butter Chicken

This week I am on a GM Diet and before I started out on this difficult diet regime, I ensured that I give my body and mind maximum pampering to last me through the week. Also, I had some friends over at home for dinner over the weekend and so an even better opportunity to indulge in some sinful food. Among others, Butter Chicken was a part of the main course and was quite a delicious companion to the Zaffrani Paneer Pilaf. I am yet to upload the recipe for the Pilaf but coming up very soon.

Ingredients
1 kg chicken (preferably boneless)
1/2 cup yogurt (should not be sour)
2 medium onions, chopped
1 tsp ginger paste
2 tsp garlic paste
2 medium tomatoes made into a paste
2 tbsp kasuri methi
1 tsp red chilli powder
1 tsp cumin powder 
2 tsp coriander powder
1/4 tsp turmeric powder
Juice of 1 lemon
400 ml chicken stock
2 tbsp butter
Whipped cream for garnishing
Fresh coriander leaves
Salt to taste
3 tbsp vegetable oil

To be dry roasted and ground to a fine powder
8-10 almonds (skin on), can be replaced by cashew nuts
2 bay leaves
6 cloves
8-10 peppercorns
1" piece cinnamon
Seeds from 3-4 cardamoms

Direction
Wash and cut the chicken and keep it in a non metallic bowl. Add red chilli powder, salt, and lemon juice and marinate for 1 hour. Once done, add the prepared powder of roasted masalas, yogurt, cumin powder, coriander powder, and turmeric powder and marinate for another hour.
In a pan, heat the oil and fry the onions till pink in color. Now add the ginger garlic paste and fry for another 2-3 minutes till raw smell goes away. Now pick the chicken pieces from the marinade and add it to the pan. Reserve the remaining marinade. Fry on a medium high flame till the juices are sealed and the meat turns from pink to whitish in color. Now add the tomato paste, kasuri methi, remaining marinade, and chicken stock and cook on medium high flame till gravy reduces to half. Check the seasoning. Add the coriander leaves and remove from heat. Take it out on a serving bowl and add the butter on top and garnish with some whipped cream. Serve hot with your choice of roti / rice / pulao.


Sunday 23 March 2014

Grape Compote Ice Cream with Candied Almond Crumble

Desserts are always the best part of any meal, especially if a person has a sweet tooth like I have. With something sweet to end the meal, I not only feel completely satisfied but also helps in my digestion. I sometimes feel bad for those who do not like anything sweet after their meal. What a miss! Especially, if it is something like this Ice Cream with a Crunch!
                                         

Ingredients
250 ml heavy whipped cream
350-400 gms red seedless grapes
6 tbsp sugar
1 tsp vanilla essence
2 tbsp water
1/2 cup Candied Almonds,crumbled in a grinder

Direction
Wash and dry the grapes on a kitchen towel. In a deep bottomed saucepan, take 3 tbsp sugar, grapes, and the water. Simmer and while the mixture comes to a boil, keep pressing the grapes with the back of a wooden spoon to bring out the maximum juice from the grapes. Continue kneading till you get a thick shiny liquid and the grapes are mushy. Be careful not to over dry or leave too much liquid in the syrup. It should not reach the caramel consistency. It should be thick but runny. Remove from heat and let it cool completely.
Now whip the whipping cream, vanilla essence, and the remaining sugar to stiff peaks, mostly with an electric beater if you do not want tired hands. Ensure that the compote is at room temperature. Now pick out the mushy grapes from the syrup with the help of a fork and fold into the whipped cream. You do not need to mix it completely. Lastly, add the syrup and swirl the mix with the help of a fork till the liquid is just absorbed but not completely mixed. Transfer the contents to an airtight container or ice cream tin and freeze for 1-2 hours till lightly set. Take out from the freezer and with the fork give a stir up and down. Place the lid back tightly and freeze for another 5-7 hours or until completely set.
To serve, make a bed with the crumbled candied almonds and place two scoops of the ice cream and cover with a few more crumbles on top. Repeat for the rest of the servings. 


Friday 21 March 2014

Power Packed Candied Almonds

There is not much to write about this post actually. It just happened! I was trying to find some options for garnishing my Grape Compote Ice Cream for tomorrow when I chanced upon this idea. I did a combination of 2-3 recipes and picking the ingredients and method of cooking that best suits me. So here it is a wonderful munch for your odd time hunger pangs, an accompaniment for your evening drinks with friends and family, or as topping for your desserts. Whichever way you use it, you just can't stop at one!

Ingredients
2 cups Almonds
2 tbsp honey
2 tbsp water
2 tsp olive oil (optional but preferred)
 1/4 cup brown sugar
1/2 tsp salt

Direction
Warm the honey, water, and oil in a deep bottomed vessel and bring to a boil. Add the almonds and continue stirring until most of the liquid is absorbed. In a small bowl, mix the sugar and salt. In a medium bowl, pour the almonds and add the sugar salt mixture. Coat the almonds thoroughly with salt and sugar mix. Line a baking tray with parchment paper and arrange the almonds in a single layer. Bake in a cold oven for 12-15 minutes at 175 degree celsius. Few things to note while baking. Stir once in between at about 10 minutes into baking. Change the oven mode to toast mode to ensure a golden browning. Lastly, just before taking out the almonds, take out a piece and eat. If it is a bit soft and chewy, it is perfectly done as it will get back its crunch once completely cool. Over baking them might burn the honey caramel.


Thursday 20 March 2014

Rassewale Aaloo with Moong Daal Paneer Paratha (Potatoes in a Spicy Tangy Gravy with Cottage Cheese Indian Flat Bread)

The next few days, till the end of this week, I am on an indulgence spree. The reason being my next weeks' GM Diet plan and so I wanted to pamper my body and my soul with some hearty dishes to last me through the diet plan. Although todays menu is not so much on the indulgence side as the cooking has been mostly done with olive oil and very little oil has been used for smearing the parathas, the potatoes are an indulgence nevertheless. Coming up over the next few days are Butter Chicken, Zaffrani Paneer Pilaf, Tandoori Aaloo, and Grape Compote Ice cream. Now after making and eating all of that I will be bound to follow the diet plan to the "T"!


Ingredients
For the Paneer Parathas
3 cups whole wheat flour
3/4 cup paneer grated
1/2 cup moong daal washed and soaked for about an hour
12-15 sticks of coriander leaves stemmed and finely chopped (reserve the stems for grinding to a paste later)
2-3 green chillies as per taste
1 tsp roasted cumin seeds
1 tbsp olive oil while kneading
1/2 cup lukewarm water
1 tsp salt
1 medium onion chopped
1 inch piece ginger, chopped
Oil for smearing the parathas while cooking

For the Rassewale Aaloo
12-15 baby potatoes, washed and boiled skin on (I like it with the skin, you can remove if you wish; you can also use regular potatoes cubed into 6-8 equal pieces each)
1 big tomato, made into a paste with 1 tbsp ginger chopped and 2 green chillies
1 tbsp store bought tomato puree or pure ketchup (optional; helps enhance the color)
1 tsp coriander powder
1 tsp red chilli powder
1/2 tsp turmeric powder
1 tsp cumin seeds
1/4 tsp hing
Salt to taste
Few curry leaves
Fresh coriander leaves for garnishing
1 tbsp olive oil or any oil/ghee of your choice

Direction
For the parathas
Make a fine paste with the soaked moong daal, chopped onions, ginger, coriander stems, green chillies, and roasted cumin seeds. You may add just a dash of water to make the paste smooth. In a bowl, take the flour and add salt. Add the chopped coriander leaves and the moong daal paste. Adding a little water at a time, knead it into a smooth dough. You may add additional dash of flour if the dough is initially too sticky. Pour the 1 tbsp olive oil through your hands into the dough and finish the kneading on a flat surface. Keep covered in room temperature until rolling. Heat a girdle or tawa and roll out thin parathas with the help of little flour at a time. Do not use too much flour as it will spoil the taste. Fry the parathas on the hot girdle smearing with oil on both sides. Serve hot with Rassewale Aaloo and freshly chopped onions or pickle.
                                       
                                       
For the Rassewale Aaloo
Heat oil in a pan and splutter the cumin seeds. Add the curry leaves, slit green chillies, and hing. Now add the tomato paste and the puree (if using) and fry for 2-3 minutes. Now add the dry spices, salt and  continue frying till oil starts coming out from the sides. Now add the boiled potatoes and mix. Add enough water as you require for the gravy, about half a cup is good enough. Cover and cook on a medium flame for the potatoes to absorb the spices. Remove cover and garnish with coriander leaves. Serve hot with the parathas.


Tuesday 18 March 2014

Masala Mix Daal

The regular daal can be quite boring at times and especially if you need to make the same daals everyday with the same spicing and technique. Although there is not much that you can do with daals, there are definitely new ideas to experiment with and make this otherwise boring dish a bit more interesting and delicious. While there are many people who like their daal and cannot do without it for any meal, I do not hold a very strong liking for it and so try and experiment around it to make it more inviting. So here is one of my recent experiments with daal and I can assure you of pleasing compliments after the meal. Serve the daal with some freshly chopped onions and enhance the taste further.

Ingredients
1/4 cup masoor daal
1/4 cup toor daal
1/4 cup yellow moong daal
1 medium onion finely chopped
4-5 cherry tomatoes, halved (you can substitute this with regular 1 tomato chopped)
1 tbsp garlic-ginger grated
1 sprig fresh coriander, chopped
2 each of cardamom and cloves
1 bay leaf
1 1-inch piece cinnamon
1 tsp cumin seeds
1/4 tsp mustard seeds  
1 tsp turmeric powder
2 slit green chillies
A pinch of hing
1 tbsp tadka masala (ingredients given below)
Freshly chopped onions for serving
Salt to taste
1 tbsp oil or ghee
1/4 cup milk


For the tadka masala
1 tbsp cumin seeds
1 1/2 tbsp coriander seeds
1 tsp fennel seeds
1 tsp cloves
1/2 tsp mace powder
1/2 inch cinnamon
1 tsp kashmiri chilli powder

Directions
Wash the daals together. In a pressure cooker, take the washed daals, cardamom, cinnamon, cloves, bay leaf and green chillies. Pour water until just about 1 inch above the daal. Add salt and turmeric and pressure cook until done (took me 4 whistles on high and 1 on low). The daal should be cooked through so that the individual daals are not noticeable. So pressure cook accordingly. 
Meanwhile, dry roast the ingredients under tadka masala and grind to a smooth powder. Keep aside.
In a pan, heat the oil or ghee and splutter the cumin seeds and mustard seeds. Add the onions and fry till translucent. Now add the ginger and garlic and fry for 2-3 minutes. Add the tomatoes and continue frying until soft. Put the tadka masala and fry for few more minutes until just mixed well and oil starts coming out. Now add the hing and within a minute, add the boiled daal and stir. With the back of the laddle, gently press down on the daal to mash it further. Bring the daal to a boil adding about 1/2 cup of water, in case the daal has got too thick. Now add the milk on a low flame and stir well. Lastly, garnish with fresh coriander leaves and serve hot with roti/rice and freshly cut onions.


Monday 17 March 2014

Wholewheat Pineapple and Plum Dimple Cake

I love my afternoon tea like many others over here and I love it even more when I have something interesting to go with it. So every week I bake something delicious and healthy which will last me for the whole week as well as take care of my husband's hunger pangs when he returns from office. Today, it was going to be a simple pineapple cake with wholewheat flour and just as I was about to take something out of the refrigerator, I chanced upon these beautiful red plums which were fresh and tout and waiting to be grabbed. I immediately pounced upon them and after a quick pitting session, upgraded my recipe to a dimple cake. I have noticed, in few of my recent bakings, I have grown up as a baker and now I confidently experiment with my cakes and cookies and breads too and every time it turns out perfect. As the old saying goes, "Practise makes perfect!"

Ingredients
1 1/2 cup wholewheat flour (I use Ashirwad aata)
3/4 cup fine grain or powdered brown sugar (you can use regular sugar too)
3 eggs (I shall include the eggless version in the notes below as this recipe was originally eggless)
1/2 cup olive oil or any other oil
1/2 tsp vanilla essence
1 1/4 tsp baking powder
1/2 tsp baking soda
3 slices of canned pineapple chopped or you can use canned pineapple chunks chopped into small pieces (reserve 5 tsp of the sugar syrup)
4 red sweet plums pitted and quartered (my plums were quite oversized and hence I cut them into quarters. You can make them into halves if you have smaller ones. Make sure they are sweet enough, else dip them in the pineapple sugar syrup for 1-2 hours before use)
Icing sugar for dusting (I skipped it)

Direction
Sieve the flour with the baking soda and baking powder and keep aside. In a bowl, beat the sugar and the eggs until smooth and creamy. Now add the oil and beat further. Add the vanilla essence. Now fold in the flour little at a time until the mixture is smooth and without any lumps. The consistency will be a little thick. Now apply a little flour on the pineapple chunks and mix. Add this to the batter and give a gentle stir. Now add the reserved 5 tsp sugar syrup one tsp at a time to make the batter a bit liquidy. However, it will not be as liquid as a regular cake batter. It should be in between the consistency of a thick custard and regular cake batter. 
Pre-heat the oven at 200 degree celsius and grease a round or square baking dish. I used a spring form pan with the base lined with baking sheet and sides lightly greased as it will be easier to take the cake out later without inverting. You can use a regular dish but have to be quick with the inverting and re-inverting the cake. Pour the batter into the prepared dish and carefully arrange the pitted plums on the batter. Gently press into the batter and bake in the preheated oven for 10 minutes at 200 degree celsius and then for another 20 minutes at 175 degree celsius or until a toothpick inserted comes out clean. Remove from oven and let it cool in the pan for 10 minutes before transferring to a wire rack for cooling completely. The cake tastes best when allowed to cool completely. So hold on till it cools down!


Notes for Eggless Version:
To substitute eggs in this recipe, take 1 cup yogurt. Beat the yogurt and sugar together until creamy and then add the baking powder and baking soda. Let it stand for 3-5 minutes. The mixture will become frothy and then continue with the rest of the procedure. You do not need to sieve the flour with the baking powder or soda in this version.


Thursday 13 March 2014

Kadhai Paneer

Apart from baking, the other cooking bug that has caught my fancy these days is to prepare my own masalas. Indeed, it is an extra effort and you do get to buy it from the stores easily. However, the aroma and the taste that home ground masalas impart cannot be traded with the store bought ones. To be more traditional, I would have in fact loved to hand grind these masalas instead of the electric grinder. Alas! That is not possible for the time being. Today is a Kadhai recipe for paneer and since I have quite a lot of masalas left, chicken and veg kadhai dishes will soon follow. I recently came to know and understand the idea behind naming this dish as "kadhai". Apart from being served in a "kadhai" (which I did not have with me), this dish is essentially cooked without the cover. The ingredients in the dish are such which do not require much cooking and hence "kadhai" dishes can be easily cooked on a medium low flame without any cover and pretty fast too. For those friends who do not know the meaning of kadhai, it simply means a wok in hindi. So go ahead and prepare this "kadhai" masala and enjoy an array of delicious "Kadhai" dishes.

Ingredients
For the Kadhai Masala
6 tbsp coriander seeds
1 tbsp cumin seeds
1 tbsp fennel seeds
10-12 whole kashmiri chillies
1 1/2 tsp black peppercorns
2 1-inch piece cinnamon sticks
2 black cardamoms
8 green cardamoms (I used all 10 green cardamoms as I did not have the black variety)
2 bay leaves

Other ingredients
250 gms paneer, cubed
1 tbsp ginger, grated
1 tbsp garlic, grated
2 medium tomatoes, chopped
1/2 cup assorted bell peppers, julienned
1 tsp garam masala powder
1/2 tsp turmeric powder
1 tbsp kadhai masala
Fresh coriander leaves chopped
Salt to taste
2 tbsp oil

Direction
For the Kadhai Masala
Dry roast all the ingredients listed under masala and let it cool. Be careful not to burn the masalas. Once cooled, grind to a fine powder. Store in air tight container.

In a pan, heat the oil and fry the paneer cubes till light golden in color. Remove from heat and soak in lukewarm water until used. In the same oil, add the ginger garlic and fry till lightly browned. Now add the chopped tomatoes and fry till they are soft and mushy. Add the dry spices and fry till oil starts appearing on the sides. Now tip in the julienned bell peppers and keep stirring on medium flame till the masala thickens. Now add the paneer cubes and mix all the masalas well. If you want to have it dry, you can now add the fresh coriander leaves and let it simmer for 3-5 minutes before removing it from heat. I wanted a bit of gravy and so added about 1/2 cup of the water in which  the paneer cubes were soaked. Check the seasoning and let the gravy thicken to your desired consistency for 5-7 minutes on medium flame. Garnish with fresh coriander leaves and serve hot with rice/roti.


Tuesday 11 March 2014

Bengal Special Chorchori

Chorchori is a very simple yet delicious part of Bengali cuisine. While it is similar with the regular mix vegetable curry that we get in most other parts of the country, the addition of mustard and poppy seed paste makes it different from the rest. This dish can be prepared with any combination of veggies like spinach, drumsticks, brinjal, cauliflower, and even leftover cauliflower stems and any variety of greens. I had just a Chayote (or Squash as we call it in Bengali/Assamese) and some broad beans (or Sim in Bengali/Assamese). So go ahead and enjoy this bengal speciality with hot steaming plain rice and crispy fish fries or potato crispies (if you are a vegetarian).

Ingredients
1 chayote (squash) chopped into medium sized cubes
1 medium potato, cubed into similar size as the chayote
6-7 broad beans cut into 2" pieces
1 tbsp mustard seeds, soaked
1 tbsp poppy seeds, soaked
2-3 green chillies
1 tsp kalonji or onion seeds
1 tsp cumin powder
1 tsp coriander powder
1/2 tsp sugar
1 tbsp ginger grated
Handful of fresh coriander leaves chopped
1 tbsp mustard oil 

Direction
In a grinder, make a paste with the soaked mustard and poppy seeds and the chillies. Add a dash of water if required. Keep aside.
In a pan, heat the oil and bring it to smoking point. Now add the onion seeds and let it splutter. Tip in the grated ginger and stir for 1 min. Now add all the chopped veggies and fry on medium heat till slightly browned. Now add the dry spices and stir till the masalas are fried and evenly coat the veggies. Now add about a cup of water and cover cook till the veggies are cooked enough but not mushy or overcooked. Now add the mustard poppy paste and mix well. Cover again and cook for 5-10 minutes until the gravy dries up and the masalas and the paste gets stuck on the veggies (makhamakha in Bengali). You will know that the dish is done when you start getting the lovely aroma of the mustard seeds coming out of the pan when you remove the cover. Check the seasoning and add the sugar.It is  important to add the sugar at the end to ensure the sweetness is not lost with the other spices. Garnish with fresh coriander leaves and serve hot with plain rice and a dash of mustard oil on top (optional).


Monday 10 March 2014

Pistachio Almond Biscuit Cake


The credit for my love for baking goes to Facebook to a great extent. The food forums that I have joined there puts forth such interesting and exciting recipes that even a non-baker would be eager to give it a try. Today's recipe is a part of one of these forum's Masterchef Monday. The original recipe was a date and walnut cake (with 80 gms date and 120 gms walnut). However, I do not have a great liking for both and so decided to alter these ingredients with almond and pistachios. I had a pack of cream crackers lying on the shelf from time immemorial and I was so glad I could use it now. This recipe is definitely a keeper and once you make the basic one, you are sure to come up with some more interesting variations. I already have a few ideas floating on my mind. The best part is this cake is butter free as well as flourless. So you won't be going on a guilt trip after you finish off two or three slices at one go, or may be more! So now enjoy your afternoon tea.

Ingredients
10-12 cream cracker/ marie biscuits (approx 50 gms)
3 large eggs, separated
3/4 cup brown sugar
1/3 cup pistachios, ground to a coarse powder
1/4 cup ground almonds (soak the almonds and then peel off the skin and let them dry completely before grinding)
1 tsp baking powder
1 tsp vanilla essence
A pinch of cream of tartar (optional)
A pinch of salt (I did not add as my crackers were already salted)
A handful of almond silvers

Direction
In a food processor or grinder, put the biscuits and the sugar and pulse till the biscuits are of a gritty texture (coarse to fine). Now add the ground nuts and pulse 2-3 times. Keep aside. In a bowl, beat the egg whites with a pinch of cream of tartar. You need not bring it to a stiff peaky state, if you are using your hands. However, you can do so if using a electric beater. Both ways the cake will have almost the same effect. Now beat the egg yolks, vanilla essence, and baking powder. Add the biscuit mixture and mix well. It will be like wet sand. Finally, fold in the egg whites gently without over mixing. Garnish the top with a few almond silvers. 
Pre-heat the oven at 180 degree celsius. Line a 8" baking dish with parchment paper and pour the batter onto the dish. Tap the bottom and bake in the pre heated oven for 20 minutes until toothpick inserted comes out clean. Take out from oven and let it cool on the dish for 5 minutes. Before transferring to a wire rack, pull out the sheet and cool completely. 


Saturday 8 March 2014

Kosha Mangsho (Mutton in a Spicy Gravy Bengali Style)

It has been a through and through Bengali weekend for me starting with Matar Ghugni on friday, Bangladeshi Chicken Curry on Saturday, and now Kosha Mangsho to bring this lovely weekend to an end. It was quite a relaxed time at home as well. A bit of swimming, some shopping, and some couple time refreshed us for the week to come. This is the second time I have attempted Kosha Mangsho and as they say, it only gets better. This time the gravy was so delicious and the marination was so perfect, we just kept on licking our fingers. Scrumptious!! 

Ingredients
For the marination
500 gms mutton (I had used boneless mutton, but strongly recommend with bones as it tastes much better. I had no option)
1 medium onion, chopped
1 tbsp garlic chopped
1 tbsp ginger chopped
2-3 green chillies
1/2 cup yogurt
1 tbsp coriander powder
1 tsp turmeric powder
1 tsp salt
2 tsp mustard oil

Other ingredients
2 big onions, finely sliced
1 medium tomato, chopped
2 medium potatoes, cut into four cubes
1 bay leaf
2 cloves
2 cardamom
1 inch cinnamon
1 tbsp cumin powder
1 tsp hot chilli powder
2 tsp kashmiri chilli powder
1/2 tsp turmeric powder
1 tsp garam masala powder
1 tbsp ghee
1 tbsp mustard oil
Salt to taste

Direction
Start with marinating the mutton overnight. Make a paste with the onions, ginger, and garlic and marinate the mutton with this paste and the rest of the ingredients. Cover and keep in the refrigerator overnight. If you are short of time, you can also marinate for 2-3 hours or even less. However, the longer the marination period, the better the mutton will taste and cook. You may skip the marination if your mutton is really fresh and tender and put all the ingredients used in marination while cooking it directly as well. 
In a pan, heat the oil. Rub a little turmeric on the potato halves and fry in the oil till golden brown. Remove from oil and drain excess oil on paper towels. In the same oil, add the bay leaf, cloves, cinnamon, and cardamoms. Let it crackle. Now add the sliced onions and fry till pink and translucent. Reduce the flame to medium and fry further till slightly golden, stirring frequently. Now add the chopped tomatoes and the dry spices. Keep stirring till tomatoes are mushy and oil starts appearing on the sides. It is important to properly fry the masalas at this point as this step ensures the perfect color for your gravy. Now add the marinated mutton (it is important to take out the mutton from the refrigerator about 1-2 hours before cooking so that it comes down to room temperature). The mutton will have a lot of water in the marinade. Do not discard. Add salt as per requirement keeping in mind that you have already added during marination. Keep frying on a high flame till the masalas and the mutton are mixed well. Now reduce the flame to medium low and continue stirring intermittently ensuring that it does not stick at the bottom. We need to dry up the excess water before transferring the mutton to the pressure cooker for the final cooking. However, if your mutton is tender enough and you can already see that it is cooked, you may skip using the cooker. Replace the pan with the cooker on the stove and transfer the contents. Pressure cook for 6-7 whistles as you deem necessary depending on the extent to which your mutton is cooked in the pan. Please note that I have not added any water as I wanted a thick gravy. The mutton will anyway release a lot of far while in the cooker ensuring that it does not get burnt. Remove from heat and let the pressure release completely on its own. Now add the fried potatoes, ghee, and garam masala. Also check how well the mutton is cooked. Now close the lid and pressure cook for 1 whistle (if mutton completely cooked) or more as you deem necessary. Remove from heat and let the pressure release completely. Serve hot with plain rice.


Friday 7 March 2014

Bangladeshi Style Chicken Curry

When I posted the pictures of this dish on a food forum, the first question was how different is Bangladeshi cuisine from Indian or, more specifically, Bengali cuisine. Well, to start with, we must not forget that Bangladesh used to be a part of India and hence its cuisine cannot be vastly different from what we eat in India. However, bengalis and bangladeshis, specially, believe in home ground spices and its just a combination of different spices which makes all the difference. Having said that, I am no expert in Bengali cooking and this is just my observation. Coming back to the point, today's recipe has been adapted from a series of bangladeshi recipes for chicken and since in every recipe, I was falling short of one ingredient or the other, I decided to put together all the recipes and make something of my own. While traditionally all the spices would be ground on a pestle and mortar, modern homes do not have that luxury of space and time and hence the shortcut methods of electronic grinding come into play. However, given a chance, I would definitely love to grind my spices the traditional way!

Ingredients
For the paste
1 tbsp coriander seeds
1 tbsp cumin seeds
1/2 piece of nutmeg
1 piece of mace
10-12 black peppercorns
1 bay leaf
4-5 cloves
5-6 green cardamom
1 inch piece cinnamon
1 tbsp chopped garlic
1 tsp mustard oil
4-5 dry red chillies

Other ingredients
1/2 kg chicken washed and cut
3 medium onions, thinly sliced
1 inch piece ginger, grated
3 medium tomatoes, chopped (if the tomatoes aren't too red and ripe, you can use 2 tomatoes and 1 tbsp tomato puree)
2 medium potatoes, halved and fried
Fresh coriander leaves for garnishing
1 tsp salt plus as per taste
1 tsp turmeric powder
2 tbsp mustard oil

Direction
Marinate the chicken pieces with salt and turmeric and keep aside for 1 hour. Meanwhile, dry roast all the ingredients for the paste except the garlic and let it cool. Now, grind to a fine paste with the garlic,  oil, and a dash of water. 
Heat 1 tbsp oil in a pan and fry the potato pieces until golden and keep aside. The potatoes need not be cooked at this time. Now in the same oil, fry the chicken pieces until golden. Make sure not to over fry the pieces. You just need to get a light golden film on top. Adding the remaining 1 tbsp oil, bring it to smoking hot and add the sliced onions. Fry till translucent and then add the grated ginger. Continue frying until raw smell disappears, about 2-3 minutes. Now add the ground paste and fry on medium flame till oil starts appearing on the sides. Add the tomatoes (and the puree, if using) and fry till the tomatoes are mushy but not completely cooked. Now add the potatoes and the fried chicken and stir. Coat the chicken pieces well with the masala and then add 1 cup warm water from the sides. Cover and cook for about 10 minutes until the potatoes and chicken are tender. By now, a thin film of oil would start appearing on the top, which means your gravy is well cooked. Check the seasoning and garnish with fresh coriander leaves. Serve hot with plain rice or roti/paratha.


Thursday 6 March 2014

Matar Ghugni (Green Peas Curry)

It has been almost a week since I had anything Indian and I must admit that though I was enjoying my pastas and pizzas, once I tasted the ghugni, I realized how much I missed it. Now with my husband returning today from his tour, I am back to my regular desi cuisine. One more thing that I have realized in the past one week is that unless something goes out of your sight, you do not give it its due regard. Just as the Indian cuisine, I also missed my husband a lot and felt the importance of his presence around me. Although the only thing we do when he is around is fight, but that's all part of love. Distances does make the heart grow fonder!! Now until his next tour (which will be pretty soon though), I want to make the most of this time.

Ingredients
1 cup dried green peas
2 medium onions, chopped
1 inch piece ginger, chopped
2-3 green chillies
3-4 pods garlic, chopped
3 tbsp tomato puree
1 tsp coriander powder
1/2 tsp turmeric powder
1/2 tsp chilli powder
1/2 tsp garam masala powder
1 inch piece cinnamon
3 tbsp fried onions (1 medium onion thinly sliced and fried; this is optional. You can skip adding this ingredient, though it renders a richness to the gravy)
1 tsp freshly roasted cumin powder
Freshly cut onions and coriander leaves for onions
1 tbsp tamarind paste/chutney (tamarind paste gives a lovely sweet and tangy flavor to the gravy; it can be replaced by 1 tbsp lemon juice and a dash of sugar)
Salt to taste
1 tbsp refined oil

Direction
Wash and soak the green peas overnight or at least for 5-6 hours. Drain the soaked water, wash, and pressure cook the peas for 3-4 whistles. Remove from heat and cool. The peas should be just cooked and not mushy. However, the time for pressure cooking the peas may vary. I had to cook them for 6-7 whistles since my peas had been on the shelf for quite some time now.
Meanwhile, make a paste with the onions, ginger, garlic, and green chillies. In a pan, heat the oil and add the cinnamon stick. Now add the onion paste and fry till it turns slightly pink in color. Add the tomato puree and fry for another 3-5 minutes till mixed well. Now add the dry spices and the fried onions along with salt and fry till oil separates. With the help of a strainer, add the cooked peas while reserving the liquid. Mix well with the masala base. Now add the reserved liquid as per requirement and stir. Put in 1 tbsp tamarind paste/chutney and mix. Cover and cook the peas for another 3-5 minutes on medium flame. Check the seasoning and remove from heat. Garnish with freshly chopped onions and coriander and roasted cumin powder. Serve hot with roti/paratha.


Wednesday 5 March 2014

Wholewheat Herbed Thin Crust Roasted Veg Pizza

Pizza these days have become a common commodity readily available in every neighborhood. There was a time when I used to survive on pizzas. Then I got into a slimming spree and had to completely do away with this dish and had even lost the craving for it. However, due to my baking stint since the past one year, I have baked so much and so many pizzas that now I can easily mould my way into healthy pizzas without much to worry about those calories. So here is a wonderful way to enjoy your pizza guilt free, to a great extent, and bask in the glory of a self baked pizza.

Ingredients
1 1/4 cup whole wheat flour (Aata)
1/4 cup all purpose flour (maida)
1/2 cup warm water
3 tbsp warm milk
2 tbsp olive oil
1 1/8 tsp instant active dry yeast
1/4 tsp sugar
1/4 tsp salt
1 tsp dry thyme
1 tsp dry basil

For the topping
2-3 tbsp tomato based sauce (you can use regular ketchup or pasta/pizza sauce)
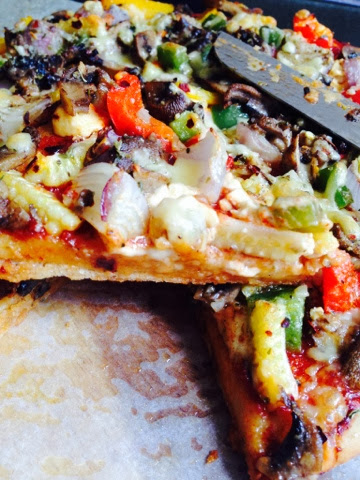
1/2 cup assorted bell peppers, chopped
1/4 cup baby corn, chopped
3-4 baby onions, diced
1/2 cup mushrooms, sliced
Few paneer cubes (optional)
1 tbsp Olive oil 
1 tsp mixed herbs (oregano, basil, rosemary, or of your choice and availability)
1/2 tsp red chilli flakes
1/2 tsp pepper powder
Salt to sprinkle
Grated cheddar cheese for garnishing (as per requirement)

Direction
In a bowl, take the warm water, milk, and sugar and mix. Now add the yeast and dissolve completely and let it stand for about 10 minutes until foamy and frothy.
In another bowl, mix the flour and salt and add the dry herbs. Pour in the yeasty mix and a little oil (do not put the entire oil at one go) and knead a soft and elastic dough. Take the dough on a clean surface and knead further for about 10 minutes until smooth and soft. This is very important to release the gluten from the flour. Cover with a cling wrap and keep in a warm place for about 1-2 hours until doubled. Since it is whole wheat flour, I had kept it a little longer although the dough had doubled in 1 hour itself. Take out the dough and knead again on a clean surface for 5 minutes. Cover again with the cling wrap and keep it back in the warm place for the second proofing, about an hour. 
Meanwhile, prepare the topping. In a bowl, put the olive oil and the herbs and mix well. Pour this oil over the chopped veggies, onions and mushrooms and toss everything well. Ensure every piece is coated well with the herbed dressing. 
Now take out the dough and place it on a parchment paper. With the help of a rolling pin, roll it out from the center towards the sides in a uniform thickness. Spread out the tomato paste evenly on the rolled out dough. Ensure that the paste is not too heavily spread, else the dough might turn out soggy. Now sprinkle the oiled veggies covering all the corners and gaps. Sprinkle a little salt and pepper and red chilli flakes. Top it with grated cheddar cheese.
Now pre-heat the oven (do this while getting the pizza ready) at 230 degree celsius for 20 minutes. While pre-heating, place an extra piece of parchment/cookie sheet on the baking tray and pre-heat the sheet as well. This will ensure a crunchy crust at the bottom. 
Bake the pizza in the pre-heated oven at 200 degree celsius for 20 minutes until the crust is golden. Keep checking in between however for the veggies. If you feel the veggies might get burnt, adjust the temperature accordingly.


Monday 3 March 2014

Cherry Clafoutis

These days I am in no mood to cook any regular meals. My husband is again out of Singapore (yeah, I know he hardly stays at home) and since he is the one who loves Indian food, there is not much cooking to do. However, I do need to feed myself and so the idea of self pampering stepped in. I had earlier noted down some delicious easy recipes but did not have the opportunity to try them. So here I am with this yummy yet simple recipe. The best part is it is not too heavy with calories and requires just 2 tbsp butter. While I was preparing this dish, I was amazed at how simple it is to make and while savouring that sinful Clafoutis, I realized how filling it was and serves as a full meal in itself. You just can't stop eating it. 

Ingredients
For the batter
1/2 cup all purpose flour
2 tbsp granulated sugar (I used brown sugar)
2 eggs
3/4 cup (180 ml) milk
1/4 tsp salt
1 tbsp butter softened
1/8 tsp vanilla essence ( my vanilla was over, so added almond essence)

For the cherry filling
12-14 canned cherries, pitted (you can use fresh ones as well)
1 tbsp butter
1 tbsp granulated sugar

Direction
Pre-heat the oven at 180 degree celsius. Put all the ingredients under batter and either whisk it with your hands or in the food processor (the easier way). Let it stand while you prepare the cherry base. Take an oven safe dish, big enough to accomodate the cherries in a single layer and to hold the batter while leaving some space from the rim. Put the 1 tbsp butter on the dish and microwave for 20 secs until melted. Now add the cherries and microwave further for 20 secs ( if you are using fresh cherries, microwave for about a minute until the cherries are softened). Now sprinkle 1 tbsp sugar on top of the cherries and microwave again for 20 secs for the sugar to melt. Alternatively, you could combine everything in a skillet and softened the cherry and sugar syrup on stove top. However, you might end up losing some of the juice while transferring the contents back to the baking dish. However, yoy can do this on stove top on a ovenproof skillet, if yoy have one. Doing it in the microwave saves time and works perfectly fine for canned cherries as they are already quite soft due to the syrup. 
Now pour the prepared batter gently over the cherry bed. Make sure you do not disturb the arrangement. Bake in the pre-heated oven for 25 minutes until golden brown on top and the edges start coming off. It will puff up inside the oven and opening the door before the baking time ends will make it collapse. However, keep an eye from outside to prevent over browning. Serve hot with a dusting of confectioner's sugar, whipped cream, or simply as is like I had. In any way, the taste is simply divine!!


Sunday 2 March 2014

Pineapple Upside Down Cake

Probably, this is the easiest cake to bake and the yummiest to taste. This was my first attempt at making anything upside down as I was always worried that the bottom would not come out perfectly and would stick at the base and I will end up eating it all alone. However, all my inhibitions were put to rest when I turned the baking dish upside down and a beautifully baked perfect Pineapple Upside Down cake was in front of me. So never let your inhibitions get the better of you. Else, you wouldn't have got this recipe for the perfect upside down cake!

Ingredients
2/3 cup (100 gms) all purpose flour (maida)
6 slices of canned pineapple (reserve 3 tbsp of the liquid)
Glazed cherries for putting between the rings and in the center of the rings
2 eggs
1/2 cup (100 gms) butter plus for greasing
1/2 cup plus 2 tbsp fine sugar
1 tsp baking powder
1/4 tsp baking soda

Direction
Pre-heat the oven at 175 degree celsius. Take a square or circular baking dish or tin and grease it with butter. Sprinkle the 2 tbsp sugar evenly on the base. Arrange the pineapple rings on the base, three in a row (I used a square dish). Now place a glazed cherry inside every ring and in between the gaps. Keep aside. 
In a bowl, combine the egg, butter, and sugar and beat till smooth and creamy. Now add the flour (sifted with baking powder and baking soda) and fold into the wet mixture. Add the reserved 3 tbsp  of the canned syrup to make the batter a little liquidy. Now pour the batter gently onto the prepared dish. It will just cover the rings. Bake the cake at 175 degree celsius for 20 minutes without disturbing and then for another 10 minutes until a toothpick inserted comes out clean. Remove from oven, gently ease a spatula or a knife around the edge of the tin or dish, and with the help of a plate placed at the rim of the baking dish, with one shot immediately turn the dish onto the plate. Voila! A beautiful Pineapple Upside Down cake would be resting on your serving plate waiting to be served. Cool the cake completely before serving. I like my piece of cake a little cold and so refrigerated the cake and took it out just 10 minutes before serving.
                                        

Authentic Chicken Dum Biryani

My friend who was here last evening for a dinner get together shared with me what one of her Muslim friend's Mom had told her once and I quote, "The one who can cook the perfect Biryani, can cook almost anything in this world!" With these words, she and her family showered me with loads of appreciation for the most wonderful biryani they have had in recent times. I could not believe, in fact, that I had actually cooked that delicious Biryani. Every grain, every piece of meat, every flavor and all the spices were so well balanced and complimented each other so well that we just could not stop eating. The best part was that there was not a single grain sticking to the bottom of the vessel (I did not even use a non-stick one) even after putting the biryani on "dum" for almost 2 hours. While I did struggle a lot in the past with this dish, I never gave up and finally after so many failed attempts, I have a recipe for the most loved dish of my husband! So here's presenting the newest feather (read dish) in my kitchen experiments, the perfect Chicken Dum Biryani.

Ingredients
For the Biryani Masala 
1 tbsp coriander seeds
1 tbsp cumin seeds
2-3 pieces of green cardamom
4-5 cloves 
2 small sticks cinnamon
1/2 piece nutmeg (javitri)
2 pieces mace
5-6 dry red chillies (as per taste)

Other Ingredients
4 cups basmati rice, washed and dried in a colander
1 kg chicken, washed and cut
1 cup yogurt, whipped
1 tbsp ginger, grated
1 tbsp garlic, minced
1 sprig mint leaves, finely chopped
1 sprig coriander leaves, finely chopped
2 each of cardamom, cinnamon, cloves and star anise
5 medium onions, finely sliced and deep fried until crisp and golden brown (drain on paper towels to remove excess oil)
2-3 tbsp ghee (this is to be used while layering the rice and chicken; use as per requirement)
2 medium potatoes, halved and fried till golden brown
1 big potato, thinly sliced
A pinch of saffron, soaked in 2 tbsp cold milk (optional)
1+1 tbsp salt
Aata dough for lining the lid of the vessel

Direction
Marinate the chicken pieces with 1 tbsp salt and keep aside for 30 minutes. Meanwhile, in a pan, dry roast all the ingredients given under Biryani masala and let it cool. Then grind to a fine powder and keep aside.
Wash the marinated chicken pieces with water and drain any excess liquid. Now add the yogurt, biryani masala, ginger, garlic, 1 tbsp salt, and half of the fried onions. Mix everything well and cover with a cling wrap. This has to be marinated for a minimum of 2 hours. For best results, marinate overnight and keep it in the refrigerator. I planned the Biryani a little late and could marinate for just 2 hours. It came out perfectly well and the chicken did absorb all the spices. However, I strongly recommend overnight marination.
                                       
                                       
While the chicken marinates, prepare the rice. The rice should be just 80% done. While making the rice, add the cardamoms, cinnamon, cloves, and star anise for extra flavor. Once the rice is done, drain the excess liquid completely and spread out the rice on a flat surface or plate.
Now its time to prepare the assembling. Take the vessel where you will be putting the biryani on dum. Grease the base and the sides of the vessel with a little ghee on your palm. Now line the botttom of the vessel with the sliced potatoes evenly ensuring minimum gaps. If your vessel is too big, you can use extra potato pieces. Use as per requirement. This is a crucial step as this will ensure that the biryani does not stick to the bottom.
                                      
Now, put the first layer of rice followed by a half of the marinated chicken. Sprinkle some chopped coriander and mint leaves followed by half of the remaining fried onions and about 1 tbsp of ghee. Repeat with another layer of rice, chicken, coriander, mint, remaining fried onions, and ghee. Now put in the last layer of rice and sprinkle the kesar/saffron milk on top. Pour in some ghee and tightly seal the vessel with the atta dough that you had prepared and close the lid. Ensure that there are no gaps in the lid through which the steam can escape. Keep the vessel on a tawa or iron girdle and keep the flame at the minimum. Cook the biryani on dum for about 1- 1.5 hours. You will know that the biryani and most importantly, the meat is cooked when you start getting a lovely aroma from the mini gaps of the lid. Continue cooking on the tawa with the flame off until the tawa is warm enough to touch. Serve hot with raita and enjoy this delicious treat with your friends and family.