Thursday, 23 April 2015

Eggless Black Forest Cake-- A Humble Attempt

Ever since I baked my baby's birthday cake there has been no looking back. Orders have been trickling in, sometimes more sometimes less, but nonetheless they keep me busy and my pockets jingling (oh! How I love to have a few bucks of my own). Last week there was this order for a Black Forest Cake and while I did have it umpteen times in my life, I never baked it at home. An eggless Black Forest Cake was quite a challenge and so the research began. I do have a go-to eggless cake recipe which has never failed me but I wanted to try something new and came upon a wonderful recipe with condensed milk and my half the work was done. Black Forest is actually quite a daunting name for a very simple cake which looks stunning and very impressive and with a little bit of practice, you can easily get a professional touch. Here I share with you the procedure to assemble a Black Forest Cake. The recipe for the chocolate cake has already been shared in my previous post.
Ingredients 
2 chocolate cakes (I did a three layered cake)
1 can of seedless maraschino cherries (red cherries with syrup)
1-2 cups of chocolate shavings (depending on how much you want to use)
1 cup chopped pineapple (as my client wanted) or chopped cherries or any filling that you like (a cherry pie filling is a good option)
1 cup whipping cream (at least 35% fat)
2-3 tbsp icing sugar (as per taste)
1 tsp gelatin or agar agar powder 
4 tsp water (room temperature)
(For 2 cups whipping cream use 2 tsp gelatin/agar agar in 2 tbsp water)
Note: gelatin or agar agar is used to stabilize the cream. You can skip it if you like. 

Direction 
Start with preparing the work table. Spread 2-3 newspapers to cover up the space beneath and to avoid tedious cleaning later. Now place the cakes on two cake boards and keep two extra plates (inverted) or cake boards handy. Using a cake leveller or a long serrated knife, carefully slice the cake in two layers. If your cake has a dome, carefully level it as well. Place all the layers in separate boards or plates for later use. We  will  be making a 3-layered cake and so you can keep the fourth layer aside if you  wish or make a four layered cake as well. 
Time to start the whipping process. An electric beater or a hand mixer is a perfect thing to use at this time as beating it with your hands can take you forever. You can keep the bowl of your electric beater and the paddle attachment in the freezer for half an hour for a quicker result. Start whipping the cream with the icing sugar (add as per your taste starting with 2 tbsp) and slowly increase the speed to maximum till you achieve soft peaks. Meanwhile, dissolve the gelatin/agar agar in cold water and let it bloom for 2-3 minutes. Then heat it in the microwave for 30 secs. Take it out and keep stirring until the liquid is clear and has cooled down. Do not leave it unattended as the gelatin might set. Pour the gelatin into the soft peaked cream and now beat till stiff peaks. Keep it aside. 
Next, pour some syrup from the can of cherries into a glass or a bowl and with the help of a spoon pour 3-4 tsp of the syrup onto each of the cake layers. Ensure that you put the syrup on the side of the layer that will be facing up. 
Now starting with the lowest or base layer, start spreading the whipped cream evenly of medium thickness followed by the fruit filling and some chocolate shavings. 
Now spread some more cream on the next layer on the side that will be facing down the layer you just prepared. Carefully pick it up and gently place it on the prepared layer, creamed side down. It is bound to get a bit of messy on your hands. Just bear it!
Repeat the filling process again for the next layer. First drizzle some syrup, followed by a spread of whipped cream, fruit filling and finally some chocolate shavings. Again apply some cream on the third layer of the cake on the side that  will be facing down and gently place it on the second filling. If you are doing a third filling, simply repeat the process you just did. If not, now add some more cream on top and evenly spread it on the surface and the sides. Try and achieve as smooth a finish as you can. 
Next, with the help of an angled spatula or spoon, gently apply the chocolate shavings on the side all along. Fill some whipped cream onto a piping bag and using Wilton star tip 22 make swirls in the top. Place a cherry on each individual swirl and fill the remaining space on the top with more chocolate shavings. Slice, serve and enjoy!!


Sunday, 12 April 2015

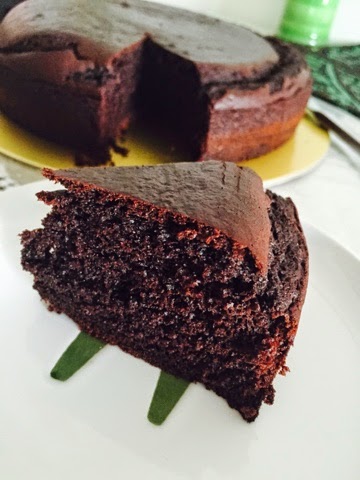
Eggless Chocolate Cake

Eggless baking never inspired me and I am not too fond of the taste either. However with client orders for eggless cakes, I do need to bake quite often especially when most of my clients are pure vegetarians. While my regular eggless cake with yogurt is quite good, but there is a little trick to make it light and fluffy which comes with the right and timely whipping of the batter. So the result is not always the best. I was told about the milkmaid version of eggless cakes by many but I did not really try it until this weekend. I have a Black Forest cake order for next week and I wanted it to be just perfect as it was for a couple's 6th Marriage Anniversary. I tried the milkmaid version from the Nestle official YouTube channel and the result was just fabulous!! Light and spongy and moist and exactly the taste of cakes baked with eggs. Best part is that it is a one bowl recipe and does not need too much whipping or effort. Just add, mix, and bake!!
Ingredients 
1 tin or 400 gms nestle milkmaid condensed milk  (my tin was 392 gms and I used the low fat one)
100 gms butter or approximately 1/2 cup at room temperature  
1 tsp Vanila extract 
175 gms flour sifted 
25 gms Cocoa powder 
1 tsp baking powder 
1 tsp baking soda 
1/4 tsp salt if using unsalted butter 
200 ml soda water (any liquid drinking soda will do)

Direction 
Pre heat the oven at 180 degree celcius and grease and line an 8" round baking tin with parchment paper and keep aside. 
Sift the flour, baking powder, baking soda, salt (if using), and cocoa powder and keep aside. 
In a bowl mix the condensed milk and butter till smooth and creamy without any buttery lumps. Now add the vanilla and mix. Add the flour, alternating with the drinking soda, in three batches beginning and ending with the flour. Mix everything well until just combined. Do not overmix. 
Pour the batter into the prepared pan and bake in the pre-heated oven for 30-35 minutes until a toothpick inserted comes out clean. Remove the cake from the oven and let it cool in the pan for 10 minutes and then transfer to a wire rack for cooling completely. 

Thursday, 2 April 2015

Yeast Free Wholewheat Thin Crust Pizza

Every time I ordered a thin crust pizza at Pizza Hut, I would start wondering what ingredients they use to make it so unbelievably thin, flaky, and crusty and yet holding so well. I tried asking them many times the ingredients/recipe/procedure but would always be turned down saying it was their trade secret. I tried achieving the same results at home but would not come close to what I eat at the joint. 
Today as I set about to make pizzas for my baby's pizza party, I realised that my yeast is dead and cannot be used. I thought and knew for certain that there are yeast free recipes available online and started my search. While most recipes used more or less the same ingredients, there were a few exceptions and after my quick 5 minute research, I decided to create my own. I am so thankful to Mr. Yeast that he did not bloom and gave me this opportunity to bake my most yummy pizza ever and exactly the way I like it. Rest in peace Mr. Yeast! Sorry, but you won't be called for a pizza dough next time as I absolutely love it without you!! 😜😜

Ingredients 
1 1/2 cup whole wheat flour 
1/2 cup bread flour (can be replaced with self raising flour/all purpose flour/maida/whole wheat flour) 
1/4 cup raw wheatgerm (optional; I added just to make it more nutritious)
1 tsp salt
1 tsp garlic powder (or any spice that you prefer)
1 tsp baking powder 
1 tbsp cornflour plus more for dusting 
2 tbsp olive oil plus more for greasing (I used the oil from my can of Sundried tomatoes and it gave a superb flavor to the dough. You can use any oil that you may have from your preserves for maximum flavor; remember, the more oil you use, the flakier will be the crust. I used about 3 tbsp)
1/2-1/3 cup buttermilk or as required for kneading 

Direction 
Take all the dry ingredients together in a bowl and mix well. Add the oil and mix with your hands. It will resemble bread crumbs. Now slowly add the buttermilk and start kneading a soft but stiff dough. We do not need a wet dough but a smooth one. Towards the end, you can lightly grease your hands to smoothen the dough and soften the dry edges. Cover and keep aside for 15 minutes. 
Meanwhile, pre-heat the oven at maximum temperature for 20 minutes. If possible, it is advisable to also pre-heat the pizza stone or the baking tray where you will be baking the pizza to achieve that perfect crust. 
Now take a round/ square parchment paper about the same size as your baking tray/pizza stone and pinch out a rubber ball sized dough. Sprinkle a dash of cornflour on the parchment and place the flattened dough ball on it. Using a rolling pin, roll out the dough into a circle of about 1/8" thickness or thinner as per your liking. Spread a thin layer of pizza sauce/tomato sauce and top it with your favourite toppings. Sprinkle a generous amount of cheese to finish it off. 
Now carefully take out the pizza stone or baking tray from the hot oven and quickly place the prepared parchment with the pizza on it. Put it back into the oven and bake at 180 degree celcius for 10-15 minutes till the cheese melts and the edges look brown. Remove from oven and cut and serve hot. Repeat with the remaining dough or refrigerate for later use. Makes 4 8" pizzas.