Showing posts with label Cookies. Show all posts

Monday, 11 January 2016

Shortbread Chocolate Chip Cookies

First of all, a very happy new year to all my readers. I know I am quite late in wishing but due to health reasons I was quite tied up in the first week of the month. Nevertheless, I couldn't stay away too long from blogging and cooking and so with a very dear friend visiting us this week, I thought it was the perfect time to get back to routine and bake some yummy cookies for them to enjoy with their tea and coffee. These cookies are amazingly easy and eggless too!! You must try these if you have been looking for a quick way to heaven!! 

Ingredients 
1 cup butter, just soft enough to beat but not melted
1/2 cup sugar 
2 cups all purpose flour
1 1/2 tsp lemon extract (you can use Vanila, orange, or any flavor of your choice)
Chocolate chips for the toppings 

Direction 
Best the butter and sugar together until fluffy. Now add the extract and beat for a second. Lastly add the flour little at a time and beat until incorporated. You may use your hands at this time instead of the beater. 
Pre heat the oven at 175 degree celcius and line a baking tray with parchment paper. With the help of an ice cream scoop, scoop out small portions of the dough and drop on the prepared baking sheet. Once you have spaced all the cookies 1" apart, using your hands, smooth the cookie drops to an even top and sprinkle some chocolate chips on top. Bake in the pre heated oven for 12-15 minutes till the bottom is slightly golden and the tops spring back lightly when gently pressed. Remove from oven and let them cool in the tray for 5 minutes before transferring them to a wire rack to cool completely. Store in air tight containers. 

Thursday, 17 September 2015

Golden Baked Coconut Macaroons

Coconut is a very versatile fruit and it adapts itself to any dish very skilfully. Be it sweet or savory, a dip or a complete maincourse dish, the coconut always lends a lingering flavor to the recipe and makes it distinct and memorable. These macaroons are no less. Not only they are a weight watcher's delight with no flour or butter in its making, they are also easy to make and require just three main ingredients and are incredibly light and delicious to eat that you won't even realize when you emptied an entire batch. 
P.S.: Recipe adapted from Once Upon A Chef with some changes
                                   
Ingredients
390 gms grated coconut (I used fresh coconut but you can use dried coconut as well available in the bakery section of grocery stores)
Scant 1 cup low fat condensed milk (or regular is fine too)
1 tsp vanila extract
2 large egg whites
1/2 tsp salt

Direction
Start by dry roasting the coconut on the stove top in a pan. You may skip this step if you are using dried grated/dessicated coconut. Freshly grated coconut has a lot of moisture and hence needs to be lightly roasted to avoid a liquid batter. Dry roast the coconut till the moisture has evaporated and the coconut feels dry to the touch. Take care not to burn the coconut. Remove from stove and let it cool completely before proceeding to the next step. 
                                     
Preheat the oven at 175 degree celsius and keep a baking tray ready lined with parchment paper. 
Now, mix the condensed milk (make sure you use a little less than 1 cup) and the cooled and roasted coconut. Add the vanilla and mix and keep aside.
Now whip the egg whites with the salt till stiff peaks form. Fold in this into the coconut mixture and mix. Ensure that you only do gentle folding without flattening out the foam. 
                                      

Now take heaped tablespoons of the batter and drop them into the prepared baking tray. You might notice some liquid releasing from the batter. Try and avoid adding the liquid as you might have a burnt base if you add that, like I have in my first batch. You do not have to squeeze out the liquid, but instead just avoid scooping it into the tablespoon. Scoop more solids than liquid! Place the scoops one inch apart.
                                     
Bake in the preheated oven for 20 minutes till the base and top are deep and slightly golden respectively. I like mine to be nicely golden on the top and so kept a few minutes longer. You can bake as you like yours to be. The cookies will be soft and chewy from inside and while baking they will still be soft to the touch. That's the way they are supposed to be and so do not worry about uncooked cookies.
                                       
Once done, remove from the oven and let them cool in the tray for a minute before transferring them to a wire rack for cooling completely.
                                     
I baked in three batches and got a total of around 36 cookies or maybe more as I could not count properly due to my constant munching. :D You can also dip these cookies halfway through into melted chocolate and then chill them for a few minutes or drizzle melted chocolate on the entire batch for a more indulgent bite!


Wednesday, 29 July 2015

Red Velvet Crinkle Top Cookies--No Butter Added

Let me be honest with you. This is messiest cookie recipe I have ever handled. I almost thought of binning it at one point as I was getting quite irritated with the mess. However, the cookies are undoubtedly the best Crinkle Top Red Velvet Cookies you would have ever made. What attracted me to this recipe when there were so many available on the net and quite fuss free too? Well, this recipe uses just 3 tbsp oil and this means you can enjoy them more guilt free than the regular buttered ones and without any compromise on taste too. So if you do not mind a little messy kitchen counter and sticky hands for a while then you have come to the right place and you are guaranteed to enjoy your effort at the end of it all. 
Ingredients 
60 gms chocolate melted (the original recipe used white chocolate but I used regular dark baking chocolate)
1 1/4 cup flour
2 tbsp cocoa powder 
1 tsp baking powder 
1/4 tsp salt
2 large eggs 
3 tbsp oil
1 tsp vanila extract
2 tsp red food coloring (preferably use gel colour, either strawberry red or cherry red)
3/4 cup granulated sugar 
Confectioners sugar/icing sugar for rolling 

Direction 
Take the chocolate in a microwave safe bowl and melt it in the microwave at a 30 second interval until melted and shiny. 
In another bowl, mix the flour, baking powder, cocoa, and salt and keep aside. 
In the same bowl where you melted the chocolate, add the eggs and whip till smooth. Now add the oil, Vanila, and food coloring and whip again. Add the sugar and mix. Now add the flour mixture and mix well with a spoon till everything is well combined. The mixture will seem quite liquidy for a cookie dough but just go ahead. 

Now cover the bowl with a cling wrap with the plastic touching down on the top of the dough. I had transferred the dough entirely into the plastic wrap and that turned out quite messy while making balls out of the dough. So keep the dough in the bowl and just put the cling wrap tightly touching down on the dough. Put in the refrigerator and chill for a minimum of 2 hrs and upto overnight.
Now grease and line a baking tray and pre-heat the oven at 180 degree celcius. 
Take the icing sugar in a plate and with a tablespoon/ice cream scoop, scoop out small balls and drop on the icing sugar. Roll it on the sugar with your hands and then flatten slightly and roll again in the sugar and place on the prepared tray. Sorry no pictures to share here as my hands were all doughy. Put the cookies 2" apart as they spread out a little while cooking and so keep some space to avoid sticking to each other. Bake in the pre-heated oven for 12-15 minutes or till the edges slightly firm up while the top is still a little soft to touch. 
Cool in the tray for 5 minutes before transferring to a wire rack for cooling completely. Store in air tight containers. 


Friday, 27 March 2015

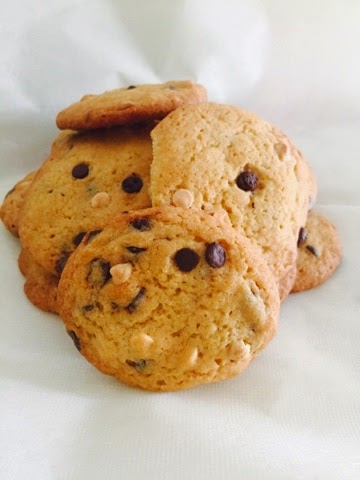
Chocolate Chip Cookies-- The Traditional Way

Chocolate Chip Cookies are a native of America and while there have been many variations to the recipe including the addition of oatmeal or nuts or different kinds of chocolate chips, the cookie still remains one of the most delicious cookie ever baked. There is very little chance that you can go wrong with this recipe as it is so easy and quick and by the time you realize, you will already be biting into a piece of warm crispy crunchy edged soft and buttery cookie!! Mmmmmmm....
Recipe adapted from Joy of Baking
Ingredients 
1 cup butter room temperature but not melted 
3/4 cup white sugar
3/4 cup brown sugar
2 eggs
11/2 tsp Vanila extract 
1 tsp baking soda
1/2 tsp salt
1/2 tsp cream of tartar (optional)
2 1/4 cup flour
1 1/2 cup chocolate chips(I used a mix of white and brown)
You can add any chopped nuts of your choice optionally 

Direction 
Cream the butter and sugar together till smooth. Add the eggs one at a time, beating after each addition. Add the vanilla extract and beat. Sift the flour, salt and baking soda. Add it to the butter mixture and fold in. It is advisable not to use the electric beater at this stage. Lastly add the chocolate chips and any chopped nuts if you are using. Mix well. 
Pre-heat the oven at 180 degree celcius and line a baking tray with parchment paper. With the help of an ice cream scoop or a tablespoon, drop half scoops into the prepared tray. Two things to note here. Firstly, do not flatten the balls. Doing so, you will end up with joined edges as the cookies will flatten out on their own while baking. Secondly, do not place the cookies too close to each other. You can bake the cookies in batches and keep the dough covered in the refrigerator while one batch bakes. Over crowding will ruin the shape of your cookies. Lastly, bake fewer cookies in the first batch so that you get an idea on the perfect quantity of dough to be put in the tray and the spacing to get those perfectly rounded cafe like cookies. 
Once you have arranged all the dough balls in the tray, top it up with some more chocolate chips and bake in the pre heated oven for 10-12 minutes. The subsequent batches will take lesser time and so keep a close watch. Remove the cookies from the oven when you gently press down on a cookie and it springs back. Cool on a wire rack completely before transferring to air tight containers. While baking the subsequent batches, let the baking tray cool down completely (if you do not have a spare one) before putting in the next batch of dough balls. 


Wednesday, 18 March 2015

Cheese Crackers with Sundried Tomatoes

Wine and cheese make the perfect pair! The combination has been tried and tasted since centuries and is a hot favourite for all those who love their wine. To take that tradition forward, today I present a simple yet super delicious crumbly melt-in-the-mouth cottony soft Cheese Crackers with Sundried Tomatoes and I caution you, these are deadly addictive!! 
                                        
Ingredients
1 cup all purpose flour (I had cake flour at hand and so used that)
1 cup grated parmesan cheese
1/2 cup butter cold and cubed
1/2 tsp salt
1 tbsp fresh or dried rosemary leaves
Dash of red chilli flakes
1-2 sundried tomatoes, roughly chopped (I used canned)

Direction
Take the flour, butter, cheese, red chilli flakes, salt and dried/fresh rosemary leaves and form a soft dough. I used my stand mixer with the dough hook or you can also use your food processor. This is how it will look once the dough comes together.
                                  
Now take the dough out in a bowl, if using the food processor, or simply remove the stand mixer and with your hands, bring the dough together. Now add the chopped sun dried tomatoes and mix into the dough. Spread a clingwrap on a clean surface and put the dough on top and roll it into a log or cylindrical shape just like a hot dog. Wrap it tightly with the clingwrap and refrigerate for 1 hour. 
Pre-heat the oven at 200 degree celcius and line a baking tray with parchment paper. Take the chilled dough out of the fridge and unwrap. Now cut thin slices with a sharp knife and gently round the edges with the help of your fingers. It is okay if the edges or the cut isn't really smooth. That is the beauty of homemade stuff, afterall! Place the cut and rounded thin discs on the prepared baking tray and press down a few leaves of fresh/dried rosemary leaves. 
                                 
                                 
Bake in the pre heated oven for 12-15 minutes till the tops becomes golden and it springs back slightly when gently pressed with the finger. Remove from oven and let it cool on a wire rack completely before transferring to air tight containers. Remember to serve these with really chilled good Wine or Beer and enjoy with some great company! 


Monday, 15 September 2014

Eggless Torcetti or Yeasted Italian Cookies

I like to bake something new every week for my evening as well as morning tea (most importantly evening) and this week was no different. After a hectic last week and weekend with lots of gift shopping for my upcoming India trip, play dates for my baby and a barbeque party to end with, I wanted to bake something which was absolutely easy and does not take much of my time while still trying out something new. I wanted to do eggless and my Google search landed me with a interesting cookie called Torcetti from Italy. For the first time I saw a cookie with yeast and I knew I had to try this. They are believed to have come from a small mountainous town in North Western Italy. A baker wanted to use his leftover butter and so added it to his last batch of Grissini dough and rolled them in sugar and that is how they were born. The cookies are very interesting with a crunchy crust, a caramalized bottom, and a soft lemony inside. A sure ticket to heaven with your favorite cuppa! 

Ingredients
1 1/2 cup all purpose flour plus more while rolling
1 tsp instant dry yeast
40 gms cold butter
1/2 cup lukewarm water (45 degree celsius)
1 tsp+3 tbsp+1/4 cup fine grain brown/white sugar (I used brown)
1/4 tsp salt
1/2 tbsp lemon zest
1-2 tsp ground cinnamon (may require more)
3 tbsp milk for milk wash

Direction
Dissolve 1 tsp sugar and 1 tsp yeast in lukewarm water (a drop feels comfortable on the back of your wrist) and let it stand for 10 minutes or until frothy. 
In a bowl, take the flour, 3 tbsp sugar, salt and lemon zest and mix well. Cut the butter and, either using a hand mixer or with your hands, crumble the flour and butter together till it resembles bread crumbs. 
Now add the yeasty liquid and mix everything well with the hand mixer till it comes together and forms a soft yet firm dough. You may add 1-2 tbsp more flour if you find it too sticky. I added about 1 tbsp. Do not overmix. You do not need to knead it like bread dough. It just needs to  come together into a soft but smooth dough. 
Take a clingwrap and cover the dough properly. You do not need to oil it. Refrigerate the dough from 1-24 hrs. I kept it for 1 full day. The dough rises very slightly even though it has yeast in it. 
Take the dough out of the refrigerator and without bringing it to room temperature, cut into 4 blocks. Roll a dough block into a thin circle on a lightly floured surface. You may need some extra flour while rolling as it might become sticky. However, add only to remove the stickiness and do not over do it. Dust any additional flour if remaining on the dough after rolling. 

Now roll in the circle like a mat. 
Cut this rope into 3-4 equal parts and again roll them out to ropes with the to and fro movement of your hands. 
In a plate mix the 1/4 cup sugar and ground cinnamon and keep it handy. Brush the ropes with a little milk and immediatelt roll them on the sugar cinnamon mixture and bring one of the ends on top of the other to form a "tear". Place this loop/tear shaped dough on a baking tray lined with parchment paper. Repeat for the rest of the dough. 
You may use extra sugar and cinnamon for rolling if you run out of it. Roll generously on the sugar mix to get a beautiful caramalized crunchy bottom. Let the cookies rest for 20 minutes while you pre-heat the oven at 175 degree celsius. Take care not to let them rest for more than 20 minutes else you may get more of bread like texture on the inside. The cookies will now look slightly puffed. 
Bake the cookies in the pre-heated oven for 25-30 minutes or until golden on top. For the last 2-3 minutes, you may increase the temperature to 180 degree celsius with only the top rod to get a more golden shade. 
Cool on a wire rack completely before storing them in air- tight containers and enjoying them with your favorite cuppa!!


Tuesday, 26 August 2014

Starbucks Oatmeal and Raisin Monster Cookies

Shopping in Singapore is good as long as you do not have clothes to alter. Unlike India, most stores here do not have a separate alteration counter and once bought, you really have to go places looking for nearby alteration services. On his birthday, husband bought some new formal trousers and the store gave him a vague idea about availability of alteration services in the next mall. We were running short of time and so decided to come back later. 
The next weekend we headed to the same mall as guided by the store sales guys (another problem in Singapore, Guidance!) and spent almost 1 hour looking for it but in vain. The poor 2 1/2 toddler obviously got exhausted with all the useless walking and demanded for a cookie. Luckily, there was a Starbucks right in front of us and we got her a monster cookie while the father continued with his search. The cookie was truly a monster and too heavy for my little one to finish it all (I was hoping she doesn't anyway!). So the rest was left to me and I am sure the others seated nearby could not have missed my grin when my baby said, " No More." As I dug  my teeth into that cookie, I was blown away. I usually do not enjoy cookies and cakes from outside but this was something else. Lightly crunchy, chewy, and melt-in-the-mouth, the cookie was to die for. I immediately got on to the job of finding its recipe using their own free Wi-Fi but nothing fruitful came up. I continued my search at night and finally found a recipe which seemed to do justice to those cookies. As for the trousers, they are still lying helpless in my husband's wardrobe waiting for an alteration! 
Ingredients
1 1/2 cup old fashioned oats (not quick cooking ones)
1/2 cup all purpose flour (you can use wholewheat also; I wanted to try the recipe as is to see how close it came to those cookies and hence did not alter the recipe)
1/2 cup brown sugar (I realized my brown sugar was inadequate and so added some white sugar as well; the original recipe called for an additional 1/4 cup white sugar, which I skipped)
6 tbsp or 85 gms butter at room temperature
1 egg 
1 tsp vanila extract
1/4 tsp baking powder
1/4 tsp baking soda
1/4 cup black raisins
1/4 cup dried cranberries (you can replace with more raisins)
1/4 cup walnuts
More raisins for topping

Direction
In a food processor, grind the oats, flour, baking powder, baking soda, walnuts, cranberries, and raisins. Keep aside. 
In a mixing bowl, take the butter and sugar and beat till smooth and light. Add the egg and vanila essence and whip further till creamy. Now slowly add the oats mixture and mix till everything is well combined. 
Pre-heat the oven at 180 degree celsius. Line a baking tray with parchment paper. Take spoonfulls of the batter and drop it on the prepared tray. Gently flatten the top with the back of the spoon into a flat disc. Do not keep it too thick nor too thin.  Leave a space of 2" and repeat with the rest of the dough. Sprinkle some raisins on top and gently press it down. Bake in the pre-heated oven for 15 minutes until slightly golden on top but still soft to touch. Gently press down on one cookie with your index finger and if it springs back, you will know your cookie is done. 
Remove from the oven and let it rest in the pan for 10 minutes. Transfer to a wire rack and cool completely and then store in air tight container. Enjoy this Starbucks style Monster cookie with your daily cuppa! Makes 16.


Tuesday, 12 August 2014

Wholewheat Jaggery and Ginger Biscuits

I am dedicating this post to my dear Aunt, Ira Chakraborty or Ira Jethai as we lovingly call her. Jethai refers to Mom's elder sister in Assamese. She is no longer with us today but her recipes continue to remind us of her beautiful and loving ways of showing her love for us through her awesome yet simple dishes she used to cook for us whenever we used to visit her. 
A very soft spoken lady, she was the eldest of the family and I used to hear it from Mom how she used to be the strict guardian when it came to protecting and disciplining her siblings. It has been almost 2 years now and while we are busy with our routine lives, her memories and thoughts continue to linger in our minds. The recipe for these biscuits were recently found by one of her daughters, who made them and then shared the recipe with me. The only change I made was with the flour and the kind of sugar used in the recipe. The cookies are deliciously crunchy and healthy and leaves me with fond memories of her everytime I take a bite with my cuppa!
Ingredients
1 3/4 cup (150 gms) wholewheat flour
1/4 cup (50 gms) wheat germ (optional; can be replaced with equal quantity wholewheat flour)
1/2 cup (100 gms) butter
1/2 cup (100 gms) brown sugar (you can reduce the quantity if you want as per your taste)
1/2 cup jaggery grated
1/2 tsp baking powder
1 tsp baking soda
2 tsp ginger powder
1/4 tsp salt
1 tsp lemon juice

Note: If you are using all cup measurements, please use it throughout and do not mix the metric. If you use cup measurements for some and grams for other ingredients, you might end up with a imperfect batter/dough. 

Direction
Take the butter, sugar, jaggery, lime juice, and ginger powder in a bowl and melt it, either in the microwave or on stove top. If using the microwave, ensure that the jaggery is completely melted and no solids remain. Keep aside and let it cool. 
Now sift the flour with soda, baking powder, and salt. Take this in a bowl and add the wheat germ, if using. Now add the melted butter and jaggery mixture and start mixing the dough to a smooth lump. Ensure that the dough is not too dry nor too wet and the mixture just holds together. 
Pre-heat the oven at 180 degree celsius and line a baking tray with parchment paper. Take small portion of the dough in your hands and gently roll it between your palms and flatten it to about 1/4 inch thickness. Arrange the flattened dough balls on the prepared baking sheet. Repeat for the rest of the dough. Keep at least 1" space between the cookies as they expand while baking. 

Sprinkle some sugar on top and bake in the pre-heated oven for 15-20 minutes till the cookies are browned (not burnt) but still a little soft to touch. Do not bake the cookies till hard. You will end up with rock hard cookies. 
Remove from oven and let it cool in the pan for 10 minutes. Transfer to a wire rack and let it cool completely before storing in air tight jars. 


Wednesday, 11 June 2014

Wholewheat Cake Rusk

Just back from a wonderful holiday in Hong Kong and immediately after that fell terribly sick. All the recharging and rejuvinating done during the holidays went in waste. Nevertheless, the tummy continues to feel hungry and even more when I haven't had something comforting in the past few days. So I went through the pinned recipes in my diary and found this nostalgic cake rusk recipe which refreshed my childhood memories of one of the oldest bakery in my town then, Osman Bakery. As a child, I used to hate that glass of milk which is customary for every kid to drink. These rusks, which my Dad used to bring ovenfresh from the bakery while on his way back home, were a savior then. Even today, when I want to eat something nice and feel good but without any energy for anything elaborate, these crunchy crumbly rusks are a savior and are a wonderful mate for my cup of honey lemon tea in the evening or anytime of the day. They are just the way I used to have as a kid from the bakery and I am really glad I could recreate the same taste and crunch. The best thing is they are made with wholewheat although ideally it should have been all purpose flour. Frankly though, there is no difference in taste and I had completely forgotten about the wholewheat quotient until I sat down to write the ingredients!


Ingredients
1 cup wholewheat flour (ideally, all purpose flour though no difference in taste)
3 eggs
100 gms butter (approx 1/2 cup)
1/2 cup brown sugar, fine grain or powdered (white sugar is used ideally; I wanted to make it as healthy as possible)
1 tsp vanila essence
2-3 drops yellow food color
1/4 tsp baking soda
1/3 cup tutti fruity (optional)

Direction
Melt the butter in the microwave for 10-20 seconds until just softened. Now mix the sugar and whip till creamy and fluffy. Now add the eggs and beat further. Add the vanila essence and food color and mix. Now sift the flour and baking soda together and fold in to the egg mixture little at a time. Lastly, fold in the fruit bits and mix. Pour into a greased or lined medium square baking tin and spread out the batter, which won't be too runny. Smoothen the top and bake in a pre-heated oven at 180 degree celsius for 20-25 minutes until a toothpick inserted comes out clean. The original recipe called for 50 minutes but mine was done in 20 minutes flat. Remove from the oven and let it cool completely on a wire rack.
                                          
Now, place the cooled cake on a plate and cut into squares or any desired shape. Place the cut squares on a baking tray (need not be greased or lined) and bake at 150 degree celsius for 20 minutes. The baking time here depends on how you like your rusks, hard or softly crunchy. In any case, the rusks while in the oven will still be little soft and will get crunchy only once cooled. So choose your baking time accordingly. I baked them for 25 minutes while turning the sides once in between for uniform browning on both the edges. Once cooled, store in airtight containers.


Monday, 2 June 2014

Healthy Oatmeal Chocolate Cookies - No Butter No Oil

I love to look good, look fit, look lean. Well, who doesn't? But I love to eat too, especially baked goodies. Now, that is quite a contrast given that bakery goodies quite often come loaded with butter. I and my family are not quite adapted to like the taste of healthily baked goodies and rather prefer eating the butter loaded cookies and cakes in smaller quantity. However, staying at home and stepping in and out of the kitchen all day, I like to keep munching something every now and then. With butter loaded cakes and cookies, it is never possible to keep a tab on the waistline and so I am constantly on the lookout for recipes which, although healthy, do not compromise on taste. Today's recipe is from my virtual friend Sonal's blog Simply Vegetarian. The cookies are a perfect tea time company and can also serve well as a mid morning snack with a glass of juice! These guiltfree no butter no oil cookies can be made even better by selecting chocolates which are lower on fat content. I went for 75% dark chocolate for half the quantity. Eat healthy, stay fit!


Ingredients
1 cup oatmeal flour (dry roast any variety oats and grind to a powder)
1 cup almond meal (grind almonds to a fine powder, with or without skin; I used store bought almond powder)
1/2 cup assorted chocolates (the original recipe called for chocolate chips. I wanted to clear my stock of chocolates and so skipped the chips)
1/4 cup milk plus extra (2-3 tbsp) while making the mixture
1/4 cup brown sugar (if using chocolate chips, increase the sugar by another 1/4 cup or as per taste)
A pinch of salt
1 tsp baking powder

Direction
Melt the chocolate with 1/4 cup milk in a microwave safe bowl, stirring in between. Choose a bowl which you can later use to mix the other ingredients as well.
Once melted, add all the other ingredients, except the extra milk, one at a time and start mixing. You can see the dough getting quite dry by now and so start adding the milk 1 tbsp at a time till everything just comes together. Do not add excess milk else your cookies will spread out on the baking sheet and won't hold shape. 
Pre heat the oven at 180 degree celsius and line a baking tray with parchment paper or silicon sheet or simply grease the tray.
Now, grease your hands very lightly and pinch out small balls and place it on the prepared baking tray. Gently flatten the top and form a uniform round shape from the sides. Repeat for the rest of the dough. Now bake in the pre heated oven for 15-20 minutes. For crispy cookies, bake till 20 minutes or until the cookies are just a bit firm to touch but still a little soft in the center. For chewier cookies, bake for about 15-18 minutes. Remove from oven and cool completely on a wire rack. Store in air tight containers. Enjoy!


Tuesday, 18 February 2014

Eggless Whole Wheat Nutty Cookies

So I was cleaning the fridge today and was looking for stuff that had been there for long and are in their death bed. I chanced upon these tiny little boxes packed away in one corner of the fridge. Some crumbled almond, pista, and cashews were quietly waiting for the day when luck would shine upon them and they would be given a chance to satisfy people's palettes. So be it. I quickly took out some whole wheat / aata and the bit of butter I had in the fridge. It took me just under 1 hour to get these super crunchy and deliciously healthy cookies ready for my evening tea.

Ingredients
1 1/4 cup whole wheat flour
1/2 cup butter softened (you can quickly soften chilled butter by putting it in the microwave for 20-30 secs)
1/2 cup powdered brown sugar (white sugar can also be used)
1/4 cup crumbled nuts (Almonds skin removed, cashews, and pistachio ground to a coarse powder)
1 tsp cardamom powder
2-3 drops almond essence
1/2 tsp baking powder
1/2 cup milk

Direction
In a bowl, add all the ingredients together except the milk. Mix all well with the help of an electric beater or using your hands. Now add the milk little at a time and knead a moist but non sticky dough. The dough should not be firm but should come together. Now pull out small balls from the dough and flatten it on your palm giving whatever shape you want. Place it on a greased baking tray or baking sheet. Repeat for the rest of the dough. You can place the cookies close to each other as it will not spread. Garnish with some halved pistachios and bake in a pre- heated oven at 220 degree celsius for 30 minutes. The first 20 minutes bake in the broil mode (only top rod) for a nice golden top and the last 10 minutes bake in the regular oven mode (both the rods) at a reduced temperature of 180 degree celsius. Remove from oven and let cool on the baking tray for 5 minutes before taking out on wire rack for cooling completely. Store in air tight containers and enjoy with your evening tea/coffee.