Showing posts with label chocolate. Show all posts

Monday, 16 May 2016

Fudgy Chocolate Cake

Chocolate cake in any form and any recipe is always a delight for kids and adults alike. This is again a recipe I learnt at the cooking group I have joined recently and I am happy to say that it is delightfully easy. You can use this recipe to make a chocolate tart, as a base for fruit truffle, or to make an ice cream cake. Make it once and you will know how to use this recipe further. Enjoy!!
Ingredients
100 g salted butter
250 gms brown sugar (I used roughly 200 gms as I like it less sweet)
2 eggs
150 gms plain flour
45 gms cocoa powder
1 tsp vanilla extract 

30 ml of strong coffee (optional but recommended)

Frozen Raspberries/Strawberries (fresh can be used as well)

1-2 tbsp almond meal/semolina/desiccated coconut/plain flour for greasing(whatever is available but one of the first two options are recommended)


Direction

Grease and flour a 6" pan (I used almond meal). Pre heat the oven at 175 degree celcius. 

Melt butter in a bowl in the microwave and let it cool slightly. Add the eggs and beat. Now add sugar and mix well. Add the coffee if using.

Add rest of the ingredients and mix well making sure there are no lumps.

Pour some batter in the prepared pan and in an artistic way push raspberries into the batter.  

Pour the rest of the batter on top. Put in the middle of the oven at 175 degree celcius for about 15-20 mins. Use a toothpick to check if it is done. Batter should not get stuck on the toothpick. It should be just cooked otherwise the cake will be too dry (I went wrong here and overbaked it by about 3-4 minutes). 

Note that there’s no baking powder so cake will not rise. It should be quite flat and compact.

Serve warm with whipping cream or vanilla ice cream. The cake is well suited for freezing. Do try and experiment different recipes and tarts that you can use this recipe for. 


Tuesday, 26 May 2015

Biscuit Chocolate Cupcakes

This month has really been a very slack one in terms of getting orders. With more time at hand, I thought of putting it to good use and trying some new experiments in the kitchen. Today's recipe is a shot in the dark which hit the target very aptly. A crunchy buttery biscuit base with a soft and moist chocolate cake on top and some chocolate chips to finish it off made it quite a bite!! The recipe makes exact 12 cupcakes and are great for a mid-week treat!
Ingredients 
150 gms all purpose flour
1 1/2 tbsp cocoa powder (I used extra dark cocoa powder and so used only 1 tbsp)
1 tsp baking powder 
75 gms butter room temperature 
90 gms brown sugar (white is also fine)
2 eggs
1/4 tsp salt if using unsalted butter 
1 tsp Vanila extract 
70 ml milk
Chocolate chips to sprinkle 
For the base 
7-10 biscuits (anything that is lying unused in your pantry)
1 tbsp butter melted

Direction 
Start with the base. Crush the biscuits in a blender and add the melted butter. Grind together to form a wet sand like texture. 
Now fill in the cupcake liners till about 1/4 of the liner and press down the top with a spoon to get a smooth top. Refrigerate while you prepare the batter. 
In a bowl sift together the flour, cocoa powder and baking powder. Keep aside. 
Cream the butter and the sugar in a separate bowl. Add the eggs one at a time and beat further. Add the vanilla extract and whip. Now add the flour and milk alternately beginning and ending with flour. Whip well till all is incorporated well. 
Pre-heat the oven at 180 degree celcius. 
Now take the chilled cupcake liners out of the refrigerator and add equal spoonfuls of the batter into the liners till about 3/4 full. Place them in a muffin tray and sprinkle the top with chocolate chips, as many as you like. 
Bake in the pre-heated oven for 20 minutes or until a toothpick inserted comes out clean. Remove from oven and let it cool in the pan for 10 minutes and then transfer to a wire rack to cool completely. 


Monday, 25 May 2015

No Bake Eggless Chocolate Tart

There is nothing much to write about this post. I made this especially for a little boy who lives in my same building and whom my baby calls her "bhaiyya" and who had been craving for some chocolatey dessert since some days. The initial plan was to make some cupcakes, as that was what he had asked his Mom for, but then I had some chocolate filling in the fridge ready already and which wasn't finding its proper use. So last evening while loitering at the mall, I saw some detachable mini tart pans and knew at once how to use up the filling. The entire assembling took me flat 20 minutes and my dessert was ready in 1 hour, nice and chilled. The kiddo was super happy and I was a satisfied Aunty! 😜
Ingredients 
For the base
12-15 biscuits (you can use any non cream biscuits like marie, digestive, crackers, anything that is lying unused in your pantry)
2-3 heaped tbsp butter melted
For the filling 
2 tbsp + 2 tsp water (room temperature)
1 1/2 tsp gelatin/agar agar
1/2 cup sugar
1/4 cup water
1 tbsp honey
2/3 cup unsweetened cocoa 
1/4 cup heavy cream

Direction 
Prepare the filling
In a small bowl sprinkle the gelatin/agar agar over the water and let it bloom for 5 minutes. 
In a pan, heat the sugar and water until dissolved. Remove from heat and stir in the honey and sifted cocoa powder. Mux well till no lumps remain. Now add the heavy cream and stir and return the pan on fire. Heat the mixture while constantly stirring until small bubbles start appearing on the sides (scalding). You do not neef to bring it to a complete boil. Now remove from heat and cool it slightly by stirring. When it is warm but not hot, stur in the gelatin/agar agar and stir until no lumps remain. 
Now strain the mixture with a fine seive or cheese cloth/muslin cloth and transfer to a glass bowl. Choose a bowl which you can later cover and store in the refrigerator. Cool and bring it to room temperature. Note that you can prepare this filling in advance and store in the refrigerator. When you want to use it, simply heat in the microwave for 30 seconds and stir and bring it to room temperature. 
Prepare the base
Grind the biscuits in a blender/grinder to a fine crumb and pour in the melted butter. Pulse a few more seconds until the mixture resembles wet sand. 
Take 3-4 spoonfuls of the biscuit mixture and spread it on the tart pans and level the top. Fill till about 1/4 height of the tart pans. If you do not have tart pans, you can use individual pudding bowls or any other serving bowl of your choice. Chill in the freezer for 10 minutes. 
Now pour the chocolate filling over the chilled biscuit base and chill in the refrigerator (not freezer) until set (about 1 hour). Garnish with chopped fresh fruits and whipped cream and serve chilled. 


Thursday, 23 April 2015

Eggless Black Forest Cake-- A Humble Attempt

Ever since I baked my baby's birthday cake there has been no looking back. Orders have been trickling in, sometimes more sometimes less, but nonetheless they keep me busy and my pockets jingling (oh! How I love to have a few bucks of my own). Last week there was this order for a Black Forest Cake and while I did have it umpteen times in my life, I never baked it at home. An eggless Black Forest Cake was quite a challenge and so the research began. I do have a go-to eggless cake recipe which has never failed me but I wanted to try something new and came upon a wonderful recipe with condensed milk and my half the work was done. Black Forest is actually quite a daunting name for a very simple cake which looks stunning and very impressive and with a little bit of practice, you can easily get a professional touch. Here I share with you the procedure to assemble a Black Forest Cake. The recipe for the chocolate cake has already been shared in my previous post.
Ingredients 
2 chocolate cakes (I did a three layered cake)
1 can of seedless maraschino cherries (red cherries with syrup)
1-2 cups of chocolate shavings (depending on how much you want to use)
1 cup chopped pineapple (as my client wanted) or chopped cherries or any filling that you like (a cherry pie filling is a good option)
1 cup whipping cream (at least 35% fat)
2-3 tbsp icing sugar (as per taste)
1 tsp gelatin or agar agar powder 
4 tsp water (room temperature)
(For 2 cups whipping cream use 2 tsp gelatin/agar agar in 2 tbsp water)
Note: gelatin or agar agar is used to stabilize the cream. You can skip it if you like. 

Direction 
Start with preparing the work table. Spread 2-3 newspapers to cover up the space beneath and to avoid tedious cleaning later. Now place the cakes on two cake boards and keep two extra plates (inverted) or cake boards handy. Using a cake leveller or a long serrated knife, carefully slice the cake in two layers. If your cake has a dome, carefully level it as well. Place all the layers in separate boards or plates for later use. We  will  be making a 3-layered cake and so you can keep the fourth layer aside if you  wish or make a four layered cake as well. 
Time to start the whipping process. An electric beater or a hand mixer is a perfect thing to use at this time as beating it with your hands can take you forever. You can keep the bowl of your electric beater and the paddle attachment in the freezer for half an hour for a quicker result. Start whipping the cream with the icing sugar (add as per your taste starting with 2 tbsp) and slowly increase the speed to maximum till you achieve soft peaks. Meanwhile, dissolve the gelatin/agar agar in cold water and let it bloom for 2-3 minutes. Then heat it in the microwave for 30 secs. Take it out and keep stirring until the liquid is clear and has cooled down. Do not leave it unattended as the gelatin might set. Pour the gelatin into the soft peaked cream and now beat till stiff peaks. Keep it aside. 
Next, pour some syrup from the can of cherries into a glass or a bowl and with the help of a spoon pour 3-4 tsp of the syrup onto each of the cake layers. Ensure that you put the syrup on the side of the layer that will be facing up. 
Now starting with the lowest or base layer, start spreading the whipped cream evenly of medium thickness followed by the fruit filling and some chocolate shavings. 
Now spread some more cream on the next layer on the side that will be facing down the layer you just prepared. Carefully pick it up and gently place it on the prepared layer, creamed side down. It is bound to get a bit of messy on your hands. Just bear it!
Repeat the filling process again for the next layer. First drizzle some syrup, followed by a spread of whipped cream, fruit filling and finally some chocolate shavings. Again apply some cream on the third layer of the cake on the side that  will be facing down and gently place it on the second filling. If you are doing a third filling, simply repeat the process you just did. If not, now add some more cream on top and evenly spread it on the surface and the sides. Try and achieve as smooth a finish as you can. 
Next, with the help of an angled spatula or spoon, gently apply the chocolate shavings on the side all along. Fill some whipped cream onto a piping bag and using Wilton star tip 22 make swirls in the top. Place a cherry on each individual swirl and fill the remaining space on the top with more chocolate shavings. Slice, serve and enjoy!!


Friday, 27 March 2015

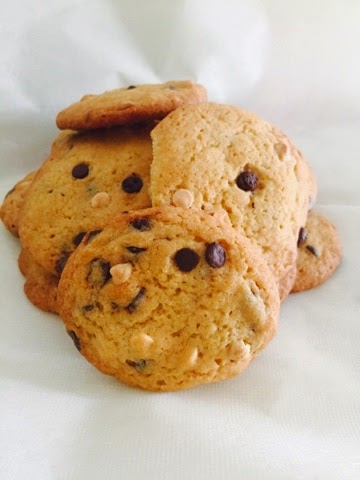
Chocolate Chip Cookies-- The Traditional Way

Chocolate Chip Cookies are a native of America and while there have been many variations to the recipe including the addition of oatmeal or nuts or different kinds of chocolate chips, the cookie still remains one of the most delicious cookie ever baked. There is very little chance that you can go wrong with this recipe as it is so easy and quick and by the time you realize, you will already be biting into a piece of warm crispy crunchy edged soft and buttery cookie!! Mmmmmmm....
Recipe adapted from Joy of Baking
Ingredients 
1 cup butter room temperature but not melted 
3/4 cup white sugar
3/4 cup brown sugar
2 eggs
11/2 tsp Vanila extract 
1 tsp baking soda
1/2 tsp salt
1/2 tsp cream of tartar (optional)
2 1/4 cup flour
1 1/2 cup chocolate chips(I used a mix of white and brown)
You can add any chopped nuts of your choice optionally 

Direction 
Cream the butter and sugar together till smooth. Add the eggs one at a time, beating after each addition. Add the vanilla extract and beat. Sift the flour, salt and baking soda. Add it to the butter mixture and fold in. It is advisable not to use the electric beater at this stage. Lastly add the chocolate chips and any chopped nuts if you are using. Mix well. 
Pre-heat the oven at 180 degree celcius and line a baking tray with parchment paper. With the help of an ice cream scoop or a tablespoon, drop half scoops into the prepared tray. Two things to note here. Firstly, do not flatten the balls. Doing so, you will end up with joined edges as the cookies will flatten out on their own while baking. Secondly, do not place the cookies too close to each other. You can bake the cookies in batches and keep the dough covered in the refrigerator while one batch bakes. Over crowding will ruin the shape of your cookies. Lastly, bake fewer cookies in the first batch so that you get an idea on the perfect quantity of dough to be put in the tray and the spacing to get those perfectly rounded cafe like cookies. 
Once you have arranged all the dough balls in the tray, top it up with some more chocolate chips and bake in the pre heated oven for 10-12 minutes. The subsequent batches will take lesser time and so keep a close watch. Remove the cookies from the oven when you gently press down on a cookie and it springs back. Cool on a wire rack completely before transferring to air tight containers. While baking the subsequent batches, let the baking tray cool down completely (if you do not have a spare one) before putting in the next batch of dough balls. 


Saturday, 14 March 2015

Simple Chocolate Cake

With my home bakery slowly getting its pace and my fitness regime in full mode, I hardly have any energy left to do any blogging these days. While I am still cooking for my family and friends, I do not always have the time to post the recipe. This week I did not have any orders to complete nor much cooking to do as husband was busy with a conference. With a special house guest coming to stay with us for a night during the week, I thought it was a great idea to do some simple baking for myself for a change. So here it is, my super simple chocolate cake. Frost it or eat it as is, it is a great tea time companion!
                                       
Ingredients
1 1/2 cup all purpose flour/maida
3/4 cup brown sugar (can be substituted with regular sugar)
1/3 cup oil (I used extra light olive oil or you can use any unflavored neutral oil)
3 eggs (can be substituted with 3/4 cup whipped yogurt)
1 tsp vanila essence 
1 tsp baking powder
1/2 tsp baking soda
150 ml fresh cream ( I used some leftover whipping cream; can also be substituted with full cream milk)
55 gms chopped plain chocolate (you can either use semi sweet baking chocolate or any leftover plain chocolate like I did)
2 tbsp unsweetened cocoa powder
1/4 cup semi sweet choco chips (optional)

Direction
Pre-heat the oven at 175 degree celsius. Grease a 9" round pan and line it with parchment paper. Lightly grease the paper on top for easy removal later on. 
In a microwave safe bowl, heat the cream and chocolate for 30 seconds. Take it out, mix and put it back in the microwave for another 30 seconds. Take it out again and mix well till the chocolate dissolves. Now sift the cocoa powder and mix into the chocolate cream mixture. Mix it well till incorporated. Keep aside and mix at regular intervals so that a film does not form on top and the mixture comes to room temperature. 
Meanwhile, beat the sugar and oil till smooth. Add the eggs one at a time, mixing after each addition. Add vanila essence and mix. 
Now, sift the flour, baking powder, and baking soda. Add the chocolate cream mixture and mix well into the batter. Now add the flour in three additions, folding it in after each addition. Now add the choco chips if using and fold it in. Pour the batter into the prepared pan and bake for 35-40 minutes or till a toothpick inserted comes out clean. 
Remove from oven and let it cool in the pan for 10 minutes. Then unmould and let it cool on a wire rack. Slice and store in air tight containers. 

Note for eggless cake:
Beat the yogurt till smooth and add the baking powder (with an additional 1/4 tsp) and baking soda and let it stand for 10 minutes. It will start frothing. You need not add any baking powder and baking soda  to the flour in this case. Beat the sugar and oil together and then add the chocolate cream followed by the vanila essence. Now add the flour alternating with the yogurt mixture. Take care not to overmix in this case as we do not want to let the air bubbles escape. 


Friday, 8 August 2014

Lamingtons - An Australian Delight

Honestly, I have never tasted these before but I can guarantee mine do not taste any less than those in the bakeries! Buttery soft, melt-in-the-mouth, these are the most sinful delights I have had in recent times after those Gulab Jamuns. Soaked in a silky rich chocolate sauce and dredged in a sea of dessicated coconut, these are the one of the best frosted cakes I have had and, for a change, husband also ate them happily without making a fuss about the calories. The best thing about these are that you can store them in the refrigerator in an airtight container for as long as about 2 weeks (maybe even more) and keep nibbling on them little at a time, to soothe your sweet tooth. I have selected this post to be sent as a Guest Post for my dear friend and fellow blogger, Swayampurna Mishra Singh's awesome blog LaPetit Chef. She has a beautiful blog with some of the most delicious recipes presented in the most amazing way you can ever imagine. I wanted my post to be befitting her beautiful blog and I hope she likes it.
Ingredients
For the Lamingtons
1 1/2 cup all purpose flour (maida)
2 eggs at room temperature
1 cup fine granulated sugar (I used 3/4 cup brown sugar as I don't like it too sweet)
1/2 cup butter at room temperature
1/4 tsp salt
1 tsp vanila essence
120 ml milk at room temperature
1 1/2 tsp baking powder
For the chocolate sauce
4 cups icing sugar 
1/3 cup unsweetened cocoa powder
3 tbsp butter (preferably unsalted) cut into squares
120 ml milk at room temperature
For the coating
3/4 cup grated dry coconut or dessicated coconut unsweetened

Direction
For the Lamingtons
Pre heat the oven at 175 degree celsius and grease a 23 cm or 9" square cake pan. Line the bottom with parchment paper and keep aside. It is important to grease and then line your baking tin so that the paper stays in place when you pour the batter and hence avoid a disfigured cake. 
In a bowl, beat the softened butter till soft and creamy. Make sure you do not use melted butter. Now add the sugar and beat further till fluffy and smooth. Add the eggs one at a time and beat well till incorporated. Add the vanila extract and whip. Sift together the flour, baking powder, and salt. In three batches, add the flour to the egg and butter mixture with two batches of the milk in between. That is, first add the flour, mix, then the milk, and then again the flour, followed by milk and the last batch of flour. Make sure you fold in the flour and milk completely at each addition before putting in the next batch. 
Spread the batter into the prepared cake pan and level the top with the help of a spoon or spatula. Tap the bottom on the kitchen counter to avoid any air bubbles in the batter. Bake in the pre heated oven for 20-25 minutes till a toothpick inserted comes out clean. 
Remove the pan from the oven and let the cake cool in the pan, kept on a wire rack, for 10 minutes. Now with the help of another wire rack, turn the cake over and remove the pan as well as the parchment paper and immediately turn it over again, right side up. Take extreme care while handling the cake as it is extremely soft and prone to break. Now let the cake cool completely on the rack. 
Once cooled, cut the cake into 16 even squares. 

For the chocolate sauce
Place the powdered sugar, cocoa powder, butter, and milk in a bowl, preferably with a long handle, placed over a bigger saucepan of simmering water. Stir the mixture until it becomes smooth and of pouring consistency.
Assembling the Lamingtons
Put the dessicated coconut on a plate. Keep the chocolate sauce in a bowl near the cake squares and a third plate to keep the square once coated. Now pick a square, gently coat it in the chocolate sauce on all sides except the one without the crust and immediately roll on the dry coconut and keep it on the plate. Repeat with the rest of the squares. If the frosting becomes too thick, put it back on the simmering water till it is back to pouring consistency again. You may also add a tsp of milk if required. 
Once the lamingtons have set, put them in an air tight container in the refrigerator for as long as you want. Enjoy!


Sunday, 20 July 2014

Gluten Free Flourless Delicious Quinoa Chocolate Cupcakes

Quinoa is ruling my mind and my kitchen these days. I am loving every bit of it and thoroughly enjoying my experiments with this wonder grain. After a very Indian Breakfast staple dish, Upma, and a western Veggie Bake, it's time for something sweet. What better than a cup cake to enjoy your tea/coffee with and in fact, as a dessert too with some ice cream! As I write this post, my cupcakes are already over and I am looking forward to making them soon again. 
                                 
Ingredients (Makes 8 Cupcakes)
1 cup cooked quinoa
3 tbsp butter softened (you can reduce it to 2 1/2)
2 tbsp oil (I used olive oil)
2 eggs
1/2 cup cocoa powder
3/4 cup brown sugar (add more if you like it more sweet; I like it a bit bitter sweet)
2 tbsp milk
1 tsp vanila essence
1/4 tsp baking soda
3/4 tsp baking powder
1/4 tsp salt (skip if using salted butter)

Direction
Cook 3/4 cup quinoa in 1 1/2 cup boiling water on a medium flame till all the water is absorbed and the quinoa is transparent with a whitish tail. Cool the quinoa. Measure out 1 cup and keep aside. You can keep leftover quinoa in the refrigerator, covered, for later use. 
In a bowl, beat the eggs, milk, softened butter, and oil till smooth and creamy. Add the sugar and beat further. Now add the cooked and cooled quinoa and mix. Add the essence, cocoa powder, baking powder, baking soda, salt (if using) and beat further. 
Pre heat the oven at 180 degree celsius. Now line a muffin tray with 8 paper liners and spoon out the batter upto 3/4 level of each cup. Bake in the pre heated oven for 20-25 minutes until a toothpick inserted comes out clean and the cupcakes look set. Cool on wire rack and store in air tight container, either at room temperature or in the refrigerator.


Monday, 19 May 2014

Super Healthy Kaala Chana Brownies (Brownie with Black Peas)

When you think of brownies the first thought that comes to your mind is lots of butter and chocolate! Well, chocolate or cocoa is inevitable for a brownie otherwise it won't remain a brownie. However , the other ingredients can definitely be experimented with for more healthier option. Today's recipe has not only replaced the butter but also the flour which does not hold any particular nutritional value apart from empty calories! Go ahead and enjoy these guilt-free delights and surprise your family in a healthy way! I saw this recipe long time back in some forum and had noted down the recipe. I am glad the person who originally posted this recipe has been found. She is Soumya from Creative Saga (http://www.creativesaga.com/2014/03/black-chick-peas-brownies-eggless.html?m=1). 
                                     

Ingredients
1 1/2 cup kaala chana (can also be experimented with chick peas) soaked overnight
1/2 cup oats, any variety, dry roasted
1/3 cup brown sugar
1 tsp baking powder
1/2 tsp baking soda
1/4 cup olive oil
1/4 cup milk (use if batter too dry, not exceeding the quantity)
1/2 cup chocolate chips 
2 tbsp cocoa powder
1/8 tsp salt

Direction
Wash the soaked chana and pressure cook it for 3-4 whistles until soft. If using the canned ones, you can directly proceed to the next step.
Once cooled, drain the boiled chana in a colander and let the water dry completely, takes about an hour. Now transfer the chana to a grinder and grind to a fine powder, as fine as possible. To this add the roasted oats and further grind to a powder. Transfer to a bowl and add all the other dry ingredients. Add the oil and mix. Most likely, the mixture will be quite dry. Add the milk, little at a time, not exceeding the recommended quantity. The mixture will not be runny like a cake batter but will be of drop consistency. Fold in the chocolate chips and mix again. 
Pre-heat the oven at 175 degree celsius. Grease a medium sized cake tin or bundt pan and keep aside.
Spread the batter into the prepared pan and sprinkle some choco chips on top. Bake in the pre-heated oven for 15-20 minutes or until a toothpick inserted comes out clean. Serve warm with ice cream or just enjoy with your favorite cuppa!


Thursday, 30 January 2014

Kid's Birthday Special Muffins and Cookies

The 28th of January is a special day as my baby turned 2. Like all mothers, I wanted to make this day special for her. She also seemed quite excited about the day and so it became even more important for me to plan it a special way. However, I did not want to hold any lavish parties or invite the adult guests for dinner/lunch as it would have nothing to do with her. So I decided to celebrate her birthday in her playgroup where she enjoys the most and has all her friends. I decided to make small goodie bags stuffed with mini muffins and cookies which would be easy for little babies to eat and enjoy. Some balloons and party caps completed the set up and my baby and her friends had a wonderful time playing together and singing birthday songs. Her teacher was kind enough to send me some pics of the event and I was satisfied seeing her happy face. Here's what I made for her friends.

Mini Choco Chip Muffins

Ingredients
2 cups all purpose flour
1 egg
1/2 cup mini choco chips (I added a little bit more for the kids)
2 tsp vanilla essence
1/2 cup butter, softened
1/2 cup brown sugar
1 1/4 cup milk
1 tbsp baking powder
1/2 tsp salt

Directions
Sift the flour, salt, and baking powder and keep aside. In a bowl, beat the butter and sugar together till smooth. Add the egg and beat further. Pour in the milk little at a time and mix well. Lastly, add the vanilla essence and give a mix. Now fold in the flour mixture and gently incorporate until the entire quantity is mixed without any lumps. Now add the choco chips and mix with a spatula until just incorporated. Do not over mix. 
Pre-heat the oven to 180 degree celcius and line a mini muffin tray with liners and pour the batter till 1/3 of the cup. Bake for 10-12 minutes or until a toothpick inserted comes out clean.
                                         

Mini Dark Chocolate Muffins

Ingredients
1 cup all purpose flour
1 oz semi sweet dark baking chocolate, chopped
2 tbsp cocoa powder
2 tsp baking powder
1/4 tsp salt
1/3 cup brown sugar
1 egg
1/2 cup milk
50 gms butter

Direction
Sift the flour, salt, cocoa powder, and baking powder and keep aside. In a bowl, beat the butter and sugar till smooth. Add the egg and the milk and beat further. Now fold in the flour and mix till the batter is smooth. Lastly, fold in the chopped chocolate and stir just to incorporate. Do not over mix. 
Pour the batter into lined muffin trays up to 1/3 of the cup and bake in a pre-heated oven for 10-12 minutes at 180 degree Celsius. 

                                      
 P.S.: In the final stage, I added one M&M candy on top of each muffin, which did not turn out to be a good idea! :(

Chocolate Dipped Shortbread Ice Cream Cookies

Ingredients
2 cups all purpose flour
1 cup butter
1/4 tsp salt
1/2 cup icing/confectioner's sugar
1 tsp vanilla extract
6 oz semi sweet chocolate chopped

Directions
Beat the butter and sugar until smooth. Now, add the flour, salt, vanilla extract and knead a smooth dough. Flatten the dough into a disk shape and cover with a plastic wrap. Refrigerate for about an hour or until firm. Line a baking tray with parchment paper and cut out small ice cream shaped cookies with the help of a cookie cutter. You can use any other shape as you desire. Place the cookies on the tray and refrigerate again for 10-15 minutes while you pre-heat the oven at 175 degree celsius. Bake the cookies for 8-10 minutes until slightly browned. Remove from oven and cool on a wire rack. Meanwhile, on a double boiler melt the chopped chocolate until smooth and glazy. Now dip the cooled cookies into this chocolate syrup and refrigerate again for 10-15 minutes until the chocolate sets. Store in air-tight containers in the refrigerator and take out 10 minutes before serving.


And the final platter looked like this: