Showing posts with label eggless. Show all posts

Monday, 9 May 2016

Strawberry Crumble

With loads of strawberries packed in the freezer and not really keen to indulge in high calorie desserts, this extremely easy Strawberry Crumble recipe was such a delight. The best part about this recipe is its low calorie count and equally delicious output. I adapted the recipe from Nigella Lawson's website with very minimal changes in the sugar content. Prepare this dessert just ahead of your guests and be ready to enjoy the compliments. 
Ingredients 
500 gms strawberries quartered (I used frozen and a little less than 500 gms)
50 gms fine sugar (my strawberries were already quite sweet when bought and so I added around 30 gms or 2 tbsp)
3 tbsp ground almonds
5 ml vanila extract
Topping
110 gms plain flour
1 tsp bsking powder
60 gms chilled butter (original recipe called for 75 gms)
50 gms brown sugar
60-70 gms finely chopped almonds (increase or decrease or skip as per choice)
Whipped cream for topping (optional)

Direction
Pre-heat the oven at 200 degree celcius. Place the strawberries, sugar, ground almonds and vanilla in a medium baking dish and mix well to coat. Make sure the baking dish is deep enough not to let the strawberry juices to seep off the edges. 
In a separate bowl, rub the flour, sifted with baking powder, with the chilled butter till the mixture resembles bread crumbs. To this add the sugar, chopped almonds and mix well. Gently place the flour mixture on top of the strawberries in the baking pan and cover all edges and spread well to cover evenly. 
Bake in the pre-heated oven for 30 minutes or until the strawberry juices start seeping up from the edges reaching on to the top of the crumble and the top is golden and crunchy to touch. 
Remove from oven and serve warm with a dollop of ice cream, whipped cream or just like that! 

Sunday, 10 April 2016

Kesar Mango Kulfi

Summers are here and so is the craving for ice creams. Sadly, my daughter has a sensitive throat and tends to go down with a cough or cold whenever she eats one and so we need to avoid eating it as well. However, you cannot do much when you crave for something so dearly and so this weekend I decided to prepare a small batch of kulfis for my guests for dinner. It was a big hit and everyone including my little one enjoyed it and kept asking for more. It takes a little time to prepare this as I did not add any thickening ingredient to the milk and kept reducing it on a low flame till it reached desired consistency. Result was a delicious and rich milky goodness and flavored with my favourite fruit. Only thing that I will do differently next time is use fresh mango pulp instead of canned! Pure deliciousness!!
Ingredients 
1 litre full cream milk (if in India, do not separate the cream/malai once boiled)
1/2-3/4 can condensed milk (I used low fat and little less as my mango pulp was sweetened already)
1/2 tsp cardamom powder 
Few strands of saffron/kesar
1/2-3/4 cup mango pulp (depending on how strong flavor you want)
Chopped pistachios/dry fruits for garnishing (optional)

Direction 
Take the milk in a heavy bottomed pan and bring it to a boil. Now mix the condensed milk and cardamom powder and saffron and stir well. Keep the flame on medium low and let it simmer while stirring in between. You can do this along with other cooking that you may have  so that the job doesn't feel too tiring. You will be amazed to see how easy it is when you finish cooking and reducing the milk at the same time. Keep mixing in the layer of cream that forms on the top into the milk each time you stir. 
Once the milk is reduced to almost one-third the volume, remove it from heat and let it cool. Keep stirring again in between so that the layer of cream is constantly mixed into the milk. Once cooled completely, mix in the mango pulp. Add the pulp little at a time and stop when you are satisfied with the flavor. Pour the mixture into kulfi/popsicle moulds and freeze covered until set. 
To de mould, hold the kulfi moulds in running water for a few seconds and then release using the stick. Enjoy!!!


Monday, 11 January 2016

Shortbread Chocolate Chip Cookies

First of all, a very happy new year to all my readers. I know I am quite late in wishing but due to health reasons I was quite tied up in the first week of the month. Nevertheless, I couldn't stay away too long from blogging and cooking and so with a very dear friend visiting us this week, I thought it was the perfect time to get back to routine and bake some yummy cookies for them to enjoy with their tea and coffee. These cookies are amazingly easy and eggless too!! You must try these if you have been looking for a quick way to heaven!! 

Ingredients 
1 cup butter, just soft enough to beat but not melted
1/2 cup sugar 
2 cups all purpose flour
1 1/2 tsp lemon extract (you can use Vanila, orange, or any flavor of your choice)
Chocolate chips for the toppings 

Direction 
Best the butter and sugar together until fluffy. Now add the extract and beat for a second. Lastly add the flour little at a time and beat until incorporated. You may use your hands at this time instead of the beater. 
Pre heat the oven at 175 degree celcius and line a baking tray with parchment paper. With the help of an ice cream scoop, scoop out small portions of the dough and drop on the prepared baking sheet. Once you have spaced all the cookies 1" apart, using your hands, smooth the cookie drops to an even top and sprinkle some chocolate chips on top. Bake in the pre heated oven for 12-15 minutes till the bottom is slightly golden and the tops spring back lightly when gently pressed. Remove from oven and let them cool in the tray for 5 minutes before transferring them to a wire rack to cool completely. Store in air tight containers. 

Friday, 11 December 2015

Eggless Christmas Fruit Cake

Wishing all my readers a very Merry Christmas and a Happy New Year. I know it's a little too early to wish but I'll be gone for my annual holiday in a day's time and so this delicious Christmas Cake recipe seemed to be the perfect post to end this wonderful year. Yes, it has indeed been a lovely year for me. I never imagined the kind response and appreciation that I have received for my classes and the feedback of my happy clients. I don't know what the new year will bring for me but whatever it is, I will certainly try and enjoy every single day and live each day like there's never tomorrow. That's my New Year resolution and I truly wish that the New Year brings to each one of you all that your heart desires and may everyone be safe and healthy and stay blessed. 
Ingredients 
1 cup mixed fruit (tutti fruity bits)
1/4-1/2 cup orange juice (can be substituted with 50-50 rum and orange juice or entirely rum)
1/2 cup unsalted butter at room temperature 
1/2 cup powdered sugar 
3 tsp egg replacer mixed in 2 tbsp water (can substitute with 1/2 cup plus 2 tbsp whipped greek yogurt or hung curd; to make with eggs, simply add 3 eggs)
1 tsp orange extract 
1/4 tsp almond extract 
11/2 cups all purpose flour
1/2 cup almond meal/ flour/ ground almonds 
1 tsp baking powder 
1/2 tsp baking soda (use only if you are using yogurt instead of egg replacer)
1/4 tsp salt
1/4 cup milk
Direction 
For this recipe it is best to keep the fruit bits soaked in the Orange juice for at least 3 days for best results. 
If you are using egg replacer, prepare it first. Beat 3 tsp of the egg replacer powder with 6 tbsp water till foamy. If using yogurt, add 1/2 tsp baking soda and whip it till smooth and creamy. Let it stand for 5 minutes. 
Pre heat the oven at 180 degree celcius for 10 minutes while you prepare the batter. 
Now in the bowl of your electric mixer, beat the butter and sugar till creamy. Now add the egg replacer liquid or yogurt or eggs (if not making eggless) and beat till the mixture is foamy, smooth and creamy. Now add the extracts and beat again. Now add the flour mixture (flour, almond meal, baking powder and salt) and add the milk in alternate additions. Once the flour us well incorporated, add the fruit bits along with the liquid and fold in. Do not over mix at this stage. Transfer the batter to two loaf pans of medium size or a single big loaf pan. Bake in the pre heated oven for 15-20 minutes or until a toothpick inserted comes out clean. 


Friday, 18 September 2015

Wholewheat Bread

Conducting bread baking classes at home are proving quite beneficial to me in a way that my breads are getting better and more perfect than what they used to be. Since I am the instructor, it is extremely important for me to practice all my demo recipes before the class and thus perfection sets in. I am in love with my breads now more than ever before and hate to buy a loaf from the store even if it means taking a sweat shower in the kitchen in the unbearable Singapore heat!!
Ingredients 
2 cups wholewheat flour sifted (I have found Sharbati Atta of any brand gives you the best results; here, I have used Pilsbury Gold but Peshwai or Ashirwaad Sharbati will work equally well)
1 cup bread flour or all purpose flour 
3 tsp or 1 tbsp instant yeast 
1 tbsp sugar
2 tsp salt
1/4 cup milk powder 
250 ml warm water not exceeding 41 degree celcius or comfortable enough to hold a drop on the back of your wrist 
2 tbsp butter room temperature (I use low fat margarine)
Olive oil for greasing 

Direction 
Proof the yeast first. Dissolve the sugar into 150 ml warm water and mix in the yeast. Let it stand for 10 minutes till frothy and increased in volume. 
In another bowl, mix the flour, salt, and milk powder. Now make a well in the center and pour in the yeast and start mixing the flour and the yeast liquid. Once all the liquid is covered by the flour, start adding in water little atva time until all the water is used up (remaining 100 ml). With wholewheat breads we have to ensure that the dough is not dry but smooth and soft to the touch with slight traces of stickiness. A dry dough will result in a dry crumbly bread. 
Now transfer the sticky dough to a clean and floured work surface and using both your hands, start kneading with all your might till all the stickiness is gone. This will take 5-7 minutes. Now spread out the dough and splash 1 tbsp butter/margarine and fold in. Continue kneading till the butter is absorbed. Do not be tempted to add extra flour. Just keep kneading and in mo time the stickiness will be gone. Now add the remaining 1 tbsp butter and knead again till you have an incredibly soft and elastic dough. Congratulations! You are 70% done!!
Niw oil a big enough bowl to hold the doubled up risen dough and also oil the dough. Gently place it into the oiled bowl and keep covered in a warm place for 1- 11/2 hour till doubled in volume. 
Once doubled, punch down the dough and knead for 3-5 minutes to bring the dough into a uniformly shaped loaf. Grease a loaf tin and place the shaped loaf in it. Cover again and leave to rise for another 1 hour. 
Towards the end of the second rise, start preheating the oven at 180 degree celcius and also keep a small tray of water to build up steam. 
Brush the top of the loaf gently with milk (room temperature) taking care not to deflate the dough. Bake in the preheated oven for 20-25 minutes till you get a dark brown top and the bottom sounds hollow when tapped. 
Remove from the pan immediately and brush the top with butter. Cool completely on a wire rack before slicing. 


Tuesday, 8 September 2015

Eggless Butterless Chai Cupcakes

My new bake book that I recently bought at the Bali Airport is quite an interesting read. This is the third recipe that I have tried and has amazed me once again. The best part about this book is that there are ample recipes which are eggless and butterless for regular baking as well as exotic recipes for those special days. I will keep posting my experiments here and you can try them as well in your kitchens!!
P.S.: Recipe inspired from Bake Happy by Judith Fertig
Ingredients 
1/2 cup boiling water 
1 tea bag or 1 tbsp good quality tea leaves
1 3/4 cup all purpose flour 
2 drops chai masala drops or 1 tsp ground cinnamon, 1/2 tsp ground ginger, 1/2 tsp ground green cardamom, 1:4 tsp ground nutmeg 
1 tsp baking powder 
1/2 tsp baking soda 
1/2 tsp fine salt 
1/2 cup milk (can be replaced with almond milk/soy milk for vegan options)
1 tbsp cider vinegar or balsamic vinegar 
1/2 cup brown sugar 
1/3 cup extra light olive oil or similar 
2 tsp vanila extract 

Direction 
Preheat the oven to 180 degree celcius. Line a muffin tray with cupcake liners and keep aside. In a small saucepan, brew the tea bag/tea leaves in hot water and keep covered for 15 minutes. Do not leave the stove on while brewing. Else, the tea will get bitter.  Let it cool. 
In a medium bowl,sift together the flour, baking powder, baking soda, sugar, salt, and the spices (if not using the spice drop). In a separate large mixing bowl, stir together the milk, brewed and cooled tea, and vinegar. Allow the mixture to sit for 1 minute and then mix in the oil and vinegar and the spice drop (if not using the ground spices). 
Now whisk the flour mixture into the milk mixture, one-third at a time. Keep whisking until the batter becomes smooth and starts to thicken. 
Pour the batter upto 1/3 of the liners and bake in the preheated oven for 15-20 minutes or until a toothpick inserted comes out clean. Remove the cupcakes from the oven and set the pans on wire racks to cool completely. 


Thursday, 3 September 2015

Devil's Food Cake with Secret Creamcheese Filling

I take my home baker status quite seriously and so when it was my birthday on the first of this month, I was quite sure that while I would not mind a nice dinner outside, I would definitely love to bake my own cake, however simple it may be. 
On my recent trip to Bali, I brought back a wonderful book called "Bake Happy" by Judith Fertig. The book is a lovely collection of easy and interesting recipes and what better way to start than a special family day. Everyone loved the cake and it was my fastest moving cake till date. Got over in just one day!! Baking the cake was a bit tricky as I thought that the cake was baked but it wasn't actually which I knew only once I flipped the cake upside down. I immediately put it back in the oven with the top gently covered with an aluminium foil and my cake was perfectly done!! 
Ingredients 
Secret Creamcheese Filling 
1 package (8 oz/226gms) creamcheese at room temperature 
1 large egg beaten
1/2 tsp fine salt
1/4 cup brown sugar (original recipe called for 1/3 cup sugar but 1/4 was just perfect for me)

Devil's Food Cake
3 cups all purpose flour (I used cake flour)
1 1/2 cup brown sugar (again reduced the sugar from 2 cups to 1 1/2 cup as given in the original recipe and it was perfect)
1 tsp fine salt 
1/2 cup unsweetened cocoa powder
2 tsp baking soda
2 cups hot water
2 tsp apple cider vinegar (I used balsamic vinegar as I did not have at home)
2 tsp Vanila extract 
2/3 cup vegetable oil (I used rice bran oil)

Direction 
Preheat the oven to 180 degree celcius. Now you can either prepare a muffin tray or a 10" cake pan for baking the cake. If baked as cupcakes, it will take lesser time and is more hassle free. I did both ways and find the cupcakes were easier to bake. It will take you two batches to bake the cupcakes in a 12 hole muffin tray. 
For the secret cream filling, in the bowl of an electric mixer, beat the cream cheese until smooth and fluffy, about 2 minutes. Beat in the egg, salt, and sugar. Set the filling aside while you prepare the batter. 
For the Devil's Food Cake, in a large bowl, combine the flour, sugar, salt, and cocoa powder. In a separate bowl, mix together the baking soda and hot water, then stir in the vinegar and oil. Pour this mixture into the dry ingredients little at a time and whisk with a balloon whisk or a spatula until the batter is smooth and evenly colored. 
Fill each cupcake liner (if using muffin pans) half full with batter. Spoon a large tablespoon of the filling on top of the batter in each cupcake liner. Cover the filling again with more batter. Repeat the process for all the prepared liners. If using a cake pan, grease it well and line it with parchment paper and grease again. Now pour half the batter, top it with the cream filling and cover it up with more batter. 
Bake the cupcakes for 20-25 minutes or the cake for 25-30 minutes or until a toothpick inserted comes out clean. 
Please note, that the toothpick might have traces of the cream filling sticking to it. Look out for a clean chocolate crumb to ensure that the cake is cooked through. If the top seems to be getting too browned, cover it loosely with an aluminium foil. 
Remove the cake/cupcakes from the oven and let them cool for 10 minutes. Transfer to a wire rack and cool completely. 
P.S.: You can skip the cream filling part and enjoy the eggless chocolatey cake as is. It tastes absolutely delicious!! 


Friday, 10 July 2015

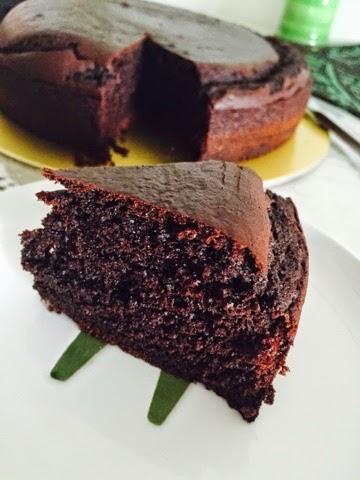
Wholewheat Eggless Butterless One Bowl Chocolate Cake

It has been the most terrible week for me so far as parenting is concerned. Baby down with a terrible toddler illness and while she was just recovering, I caught the flu and now can hardly eat and drink. Two days I spent pitying myself. Today morning I pulled myself up, put in all my will power at work and started telling myself "I feel better so much better now!" I decided to let go that sickly feeling and instead do something constructive. Asked my baby if she is craving for some chocolate cake and she jumped with joy. Doing the dishes is a pain now and so came up with this amazing one bowl Wholewheat Eggless Butterless Chocolate cake I saw on pinterest yesterday with some changes of my own. The cake is soft, moist and spongy and super delicious!! Best part is you can eat it guilt-free.... I hope I can enjoy eating it soon (have a very very very painful throat)!!!!

Ingredients 
1 1/2 cup whole wheat flour 
3 tbsp cocoa powder (I used extra dark)
1 tsp baking soda 
1/2 tsp salt
1 cup brown sugar (can be substituted with white sugar)
5 tbsp oil (I used rice bran oil but you can use extra light olive oil or any other unflavoured oil)
1 tsp Vanila extract 
1 cup water (I used room temperature but you can use lukewarm too)
1 tsp white vinegar 

Direction 
Pre-heat the oven at 180 degree celcius and grease a 8" square tin. 
In a bowl, mix the flour, cocoa, sugar, baking soda, and salt. Mix well and then add the oil followed by the Vanila extract and water. Use a balloon whisk for easy and proper mixing. You can add a handful of chocolate chips if you like for a more chocolatey flavor.  Lastly, add the vinegar and simply fold it in without much mixing. Pour the batter into the greased pan and bake in the pre-heated oven for 20-25 minutes until a toothpick inserted comes out clean. Cool on a wire rack and enjoy this guilt free delight. For the frosting, I melted some ferrero rocher chocolates (about 8) and added some warm cream (about 2-3 tbsp) till desired consistency. Frost the cake when completely cooled. The cake will keep good at room temperature in air tight container for 2-3 days. 


Wednesday, 24 June 2015

Irish Cream Eggless Tiramisu

Tiramisu and eggless do not quite sound right and I was apprehensive too. Tiramisu ought to be made with eggs and I was really stressed to think of a way to make it eggless. I was certain that the vegetarians around the globe couldn't let go of such a yummy dessert just because it has eggs. There had to be a way! And sure there was. Again, I wanted to make it little (ok! A lot) boozy for the kick. I decided to follow my own instincts and research on Google and came up with this eggless Italian delight that everyone enjoyed and relished. If you want to skip the alcohol, you can just do it. It only enhances the taste but is not an integral part. Again, if you want to make it boozy but do not have Baileys Irish Creme, you can use white rum or maybe vodka (I haven't used vodka but you sure can experiment) as well. All in all, it was a sheer delight serving this dessert and relishing it as well. It stays good for at least a week in the refrigerator if taken care to keep it covered at all times and using a clean spoon each time.
Ingredients 
1 packet (approximately 22-24) ladyfinger or sponge finger biscuits
350 ml stongly brewed coffee cooled to room temperature  (you may need more as well, so keep it handy)
250 ml bailey Irish cream (can be substituted with white rum)
75 gms castor sugar (increase as per your taste)
1 cup whipping cream 
500 gms mascarpone cheese 
Cocoa powder for dusting 

Direction 
Get the coffee ready and cool it to room temperature. Mix 150 ml of Irish cream into the coffee and keep aside. 
Next, beat the whipping cream and castor sugar to stiff peaks in a bowl. In another bowl, beat the mascarpone cheese till soft peaks. Fold in the mascarpone cheese into the whipped cream along with the remaining 100 ml Irish cream. Chill in the refrigerator until ready to use. 
Now take a rectangular 2 liter dish and open the package of lady's finger biscuits ready in another plate. Dip the biscuits in the Irish cream coffee mixture and immediately place it in the rectangular dish, arranging in whatever way you find it best to fit maximum biscuits. The lady's fingers biscuits absorb the cofee mixture too quickly and any longer absorption will result in a soggy liquid base (sharing from my experience). The quicker you can dip and arrange, the better. However, do make sure that the biscuits are dipped evenly on both the sides. 
Once the first layer of biscuits is done, take out the chilled cream and cheese mixture from the refrigerator and spread half of it on top of the biscuits. Level the top with a spatula or butter knife and you may also dust the top with some cocoa powder if you like. Now time for the second layer of biscuits. Repeat the same process as you did for the first layer. Make sure you have equal number of biscuits on top and bottom and preferably in the same sequence. If you fall short of coffee, make a fresh batch and bring it to room temperature before using. Again, spread the remaining cheese and cream mixture on top and level it. Now lightly cover the top and chill in the refrigerator for 3-4 hours or overnight. You can prepare this dessert at least 2 days in advance. 
On the day of serving, dust the top with cocoa powder and any other garnishing that you would like and keep it chilled till serving time. 

P.S.: I am sorry I don't have pictures of the steps in between as I wasn't too sure how it will turn out. The next time I make it, I will surely update this post. If you have any questions please feel free to ask me. 


Tuesday, 9 June 2015

Zucchini Mozarella Tart with Sundried Tomatoes

When I was planning my all Italian dinner last week, the dish that troubled me most was this tart. With the restriction of making it eggless, I was completely clueless and could hardly find any ideas which would give the tart some body and not make it look like a pizza. I remembered a tart I had at my Dutch friend's house and I got in touch with her. She was kind enough to help me with the recipe and everything else just fell in place. It was so wonderful to see my guests enjoy the menu and I just couldn't stop feeling proud of myself. 
Ingredients 
1 9" pie crust (I used storebought pie crust mix)
1 block of Mozarella cheese (I used Gouda cheese as I had a block lying with me but mozzarella works equally fine)
1 zucchini cut into thin slices 
1 medium onion thinly sliced 
1/4 cup Sundried tomatoes drained 

Direction
Blind bake the pie crust as per the packet instructions. Blind baking is baking the rolled out dough fitted in the tart pan and pricked with a fork all over so that it doesn't rise up. You can also place a heavy weight like uncooked rajma, chick peas etc. 
Now let the pie crust cool completely before filling. Once cooled, grate the gouda/mozzarella cheese and spread all over the base covering all the corners. Now place the zucchini in circles starting from the outside. Now spread the onion slices similarly in between the zucchini and follow with the Sundried tomatoes and freshly chopped parsley. Finally, cover with another layer of grated Mozarella/gouda cheese and bake in the pre-heated oven at 200 degree celcius for 15-20 minutes till the cheese is melted and slightly golden and the zucchini softened. Keep the tart inside the oven for 5 more minutes after switching off so that the zucchini gets cooked without burning the cheese. 
Serve hot!


Monday, 25 May 2015

No Bake Eggless Chocolate Tart

There is nothing much to write about this post. I made this especially for a little boy who lives in my same building and whom my baby calls her "bhaiyya" and who had been craving for some chocolatey dessert since some days. The initial plan was to make some cupcakes, as that was what he had asked his Mom for, but then I had some chocolate filling in the fridge ready already and which wasn't finding its proper use. So last evening while loitering at the mall, I saw some detachable mini tart pans and knew at once how to use up the filling. The entire assembling took me flat 20 minutes and my dessert was ready in 1 hour, nice and chilled. The kiddo was super happy and I was a satisfied Aunty! 😜
Ingredients 
For the base
12-15 biscuits (you can use any non cream biscuits like marie, digestive, crackers, anything that is lying unused in your pantry)
2-3 heaped tbsp butter melted
For the filling 
2 tbsp + 2 tsp water (room temperature)
1 1/2 tsp gelatin/agar agar
1/2 cup sugar
1/4 cup water
1 tbsp honey
2/3 cup unsweetened cocoa 
1/4 cup heavy cream

Direction 
Prepare the filling
In a small bowl sprinkle the gelatin/agar agar over the water and let it bloom for 5 minutes. 
In a pan, heat the sugar and water until dissolved. Remove from heat and stir in the honey and sifted cocoa powder. Mux well till no lumps remain. Now add the heavy cream and stir and return the pan on fire. Heat the mixture while constantly stirring until small bubbles start appearing on the sides (scalding). You do not neef to bring it to a complete boil. Now remove from heat and cool it slightly by stirring. When it is warm but not hot, stur in the gelatin/agar agar and stir until no lumps remain. 
Now strain the mixture with a fine seive or cheese cloth/muslin cloth and transfer to a glass bowl. Choose a bowl which you can later cover and store in the refrigerator. Cool and bring it to room temperature. Note that you can prepare this filling in advance and store in the refrigerator. When you want to use it, simply heat in the microwave for 30 seconds and stir and bring it to room temperature. 
Prepare the base
Grind the biscuits in a blender/grinder to a fine crumb and pour in the melted butter. Pulse a few more seconds until the mixture resembles wet sand. 
Take 3-4 spoonfuls of the biscuit mixture and spread it on the tart pans and level the top. Fill till about 1/4 height of the tart pans. If you do not have tart pans, you can use individual pudding bowls or any other serving bowl of your choice. Chill in the freezer for 10 minutes. 
Now pour the chocolate filling over the chilled biscuit base and chill in the refrigerator (not freezer) until set (about 1 hour). Garnish with chopped fresh fruits and whipped cream and serve chilled. 


Sunday, 12 April 2015

Eggless Chocolate Cake

Eggless baking never inspired me and I am not too fond of the taste either. However with client orders for eggless cakes, I do need to bake quite often especially when most of my clients are pure vegetarians. While my regular eggless cake with yogurt is quite good, but there is a little trick to make it light and fluffy which comes with the right and timely whipping of the batter. So the result is not always the best. I was told about the milkmaid version of eggless cakes by many but I did not really try it until this weekend. I have a Black Forest cake order for next week and I wanted it to be just perfect as it was for a couple's 6th Marriage Anniversary. I tried the milkmaid version from the Nestle official YouTube channel and the result was just fabulous!! Light and spongy and moist and exactly the taste of cakes baked with eggs. Best part is that it is a one bowl recipe and does not need too much whipping or effort. Just add, mix, and bake!!
Ingredients 
1 tin or 400 gms nestle milkmaid condensed milk  (my tin was 392 gms and I used the low fat one)
100 gms butter or approximately 1/2 cup at room temperature  
1 tsp Vanila extract 
175 gms flour sifted 
25 gms Cocoa powder 
1 tsp baking powder 
1 tsp baking soda 
1/4 tsp salt if using unsalted butter 
200 ml soda water (any liquid drinking soda will do)

Direction 
Pre heat the oven at 180 degree celcius and grease and line an 8" round baking tin with parchment paper and keep aside. 
Sift the flour, baking powder, baking soda, salt (if using), and cocoa powder and keep aside. 
In a bowl mix the condensed milk and butter till smooth and creamy without any buttery lumps. Now add the vanilla and mix. Add the flour, alternating with the drinking soda, in three batches beginning and ending with the flour. Mix everything well until just combined. Do not overmix. 
Pour the batter into the prepared pan and bake in the pre-heated oven for 30-35 minutes until a toothpick inserted comes out clean. Remove the cake from the oven and let it cool in the pan for 10 minutes and then transfer to a wire rack for cooling completely. 

Wednesday, 18 March 2015

Cheese Crackers with Sundried Tomatoes

Wine and cheese make the perfect pair! The combination has been tried and tasted since centuries and is a hot favourite for all those who love their wine. To take that tradition forward, today I present a simple yet super delicious crumbly melt-in-the-mouth cottony soft Cheese Crackers with Sundried Tomatoes and I caution you, these are deadly addictive!! 
                                        
Ingredients
1 cup all purpose flour (I had cake flour at hand and so used that)
1 cup grated parmesan cheese
1/2 cup butter cold and cubed
1/2 tsp salt
1 tbsp fresh or dried rosemary leaves
Dash of red chilli flakes
1-2 sundried tomatoes, roughly chopped (I used canned)

Direction
Take the flour, butter, cheese, red chilli flakes, salt and dried/fresh rosemary leaves and form a soft dough. I used my stand mixer with the dough hook or you can also use your food processor. This is how it will look once the dough comes together.
                                  
Now take the dough out in a bowl, if using the food processor, or simply remove the stand mixer and with your hands, bring the dough together. Now add the chopped sun dried tomatoes and mix into the dough. Spread a clingwrap on a clean surface and put the dough on top and roll it into a log or cylindrical shape just like a hot dog. Wrap it tightly with the clingwrap and refrigerate for 1 hour. 
Pre-heat the oven at 200 degree celcius and line a baking tray with parchment paper. Take the chilled dough out of the fridge and unwrap. Now cut thin slices with a sharp knife and gently round the edges with the help of your fingers. It is okay if the edges or the cut isn't really smooth. That is the beauty of homemade stuff, afterall! Place the cut and rounded thin discs on the prepared baking tray and press down a few leaves of fresh/dried rosemary leaves. 
                                 
                                 
Bake in the pre heated oven for 12-15 minutes till the tops becomes golden and it springs back slightly when gently pressed with the finger. Remove from oven and let it cool on a wire rack completely before transferring to air tight containers. Remember to serve these with really chilled good Wine or Beer and enjoy with some great company! 


Saturday, 14 March 2015

Simple Chocolate Cake

With my home bakery slowly getting its pace and my fitness regime in full mode, I hardly have any energy left to do any blogging these days. While I am still cooking for my family and friends, I do not always have the time to post the recipe. This week I did not have any orders to complete nor much cooking to do as husband was busy with a conference. With a special house guest coming to stay with us for a night during the week, I thought it was a great idea to do some simple baking for myself for a change. So here it is, my super simple chocolate cake. Frost it or eat it as is, it is a great tea time companion!
                                       
Ingredients
1 1/2 cup all purpose flour/maida
3/4 cup brown sugar (can be substituted with regular sugar)
1/3 cup oil (I used extra light olive oil or you can use any unflavored neutral oil)
3 eggs (can be substituted with 3/4 cup whipped yogurt)
1 tsp vanila essence 
1 tsp baking powder
1/2 tsp baking soda
150 ml fresh cream ( I used some leftover whipping cream; can also be substituted with full cream milk)
55 gms chopped plain chocolate (you can either use semi sweet baking chocolate or any leftover plain chocolate like I did)
2 tbsp unsweetened cocoa powder
1/4 cup semi sweet choco chips (optional)

Direction
Pre-heat the oven at 175 degree celsius. Grease a 9" round pan and line it with parchment paper. Lightly grease the paper on top for easy removal later on. 
In a microwave safe bowl, heat the cream and chocolate for 30 seconds. Take it out, mix and put it back in the microwave for another 30 seconds. Take it out again and mix well till the chocolate dissolves. Now sift the cocoa powder and mix into the chocolate cream mixture. Mix it well till incorporated. Keep aside and mix at regular intervals so that a film does not form on top and the mixture comes to room temperature. 
Meanwhile, beat the sugar and oil till smooth. Add the eggs one at a time, mixing after each addition. Add vanila essence and mix. 
Now, sift the flour, baking powder, and baking soda. Add the chocolate cream mixture and mix well into the batter. Now add the flour in three additions, folding it in after each addition. Now add the choco chips if using and fold it in. Pour the batter into the prepared pan and bake for 35-40 minutes or till a toothpick inserted comes out clean. 
Remove from oven and let it cool in the pan for 10 minutes. Then unmould and let it cool on a wire rack. Slice and store in air tight containers. 

Note for eggless cake:
Beat the yogurt till smooth and add the baking powder (with an additional 1/4 tsp) and baking soda and let it stand for 10 minutes. It will start frothing. You need not add any baking powder and baking soda  to the flour in this case. Beat the sugar and oil together and then add the chocolate cream followed by the vanila essence. Now add the flour alternating with the yogurt mixture. Take care not to overmix in this case as we do not want to let the air bubbles escape. 


Sunday, 21 September 2014

Eggless Orange and Cranberry Cake with Cinnamon Sugar Crust

It was my Father-in-law's birthday last weekend and, though he stays miles away from us, I thought of baking a simple eggless cake to remember him on this day. We are going for a 2-week long India trip this week and so while the excitement of meeting family and friends is building up, the anxiety of last minute packing is also settling in. Nonetheless, I will really miss blogging and will surely try and post some recipes in between of the local food out there. I hope all of you have a blessed Durga Puja!!

Ingredients
11/2 cup all purpose flour
1 1/2 tsp baking powder
1/2 tsp baking soda
1/3 cup oil
3/4 cup brown sugar (regular sugar is also fine)
3/4 cup yogurt.
1/2 cup orange juice
1 tsp vanilla essence
2 tsp of orange/lemon zest
1/3 cup dried cranberries rolled in 1 tbsp flour to avoid sinking
2 tbsp brown sugar
1 tsp cinnamon 

Direction
Preheat oven to 180 degree celsius. 

Take a round/bundt cake pan and grease well. Keep aside. 

Sift the flour and baking powder and keep aside.Take a separate bowl and beat oil and sugar till light and fluffy. Take yogurt in a bowl and whip it till creamy and smooth. Now add the baking soda and mix. Let it stand for 3-5 minutes till foamy and frothy. 

Add the orange/lemon zest, orange juice, and vanilla to the sugar and oil mixture and whip. Now fold in the flour and the cranberries and beat till smooth and no lumps remain. The batter will be quite thick at this point. Now gently fold in the foamy and frothy yogurt and mix in one direction till everything is well combined. Do not overmix as the trapped air might escape and you may get a flat cake. Mix the 2 tbsp brown sugar and cinnamon and keep aside. 

Pour the cake batter into the cake pan. Sprinkle the cinnamon sugar on top evenly at all places and bake at 180C degrees / 350 F for 25 to 30 minutes.Test it in the center to check if cake is done by inserting a toothpick.

Remove from the oven and let cool before slicing.

This cake tastes even better the next day after refrigeration and slices well.


Monday, 15 September 2014

Eggless Torcetti or Yeasted Italian Cookies

I like to bake something new every week for my evening as well as morning tea (most importantly evening) and this week was no different. After a hectic last week and weekend with lots of gift shopping for my upcoming India trip, play dates for my baby and a barbeque party to end with, I wanted to bake something which was absolutely easy and does not take much of my time while still trying out something new. I wanted to do eggless and my Google search landed me with a interesting cookie called Torcetti from Italy. For the first time I saw a cookie with yeast and I knew I had to try this. They are believed to have come from a small mountainous town in North Western Italy. A baker wanted to use his leftover butter and so added it to his last batch of Grissini dough and rolled them in sugar and that is how they were born. The cookies are very interesting with a crunchy crust, a caramalized bottom, and a soft lemony inside. A sure ticket to heaven with your favorite cuppa! 

Ingredients
1 1/2 cup all purpose flour plus more while rolling
1 tsp instant dry yeast
40 gms cold butter
1/2 cup lukewarm water (45 degree celsius)
1 tsp+3 tbsp+1/4 cup fine grain brown/white sugar (I used brown)
1/4 tsp salt
1/2 tbsp lemon zest
1-2 tsp ground cinnamon (may require more)
3 tbsp milk for milk wash

Direction
Dissolve 1 tsp sugar and 1 tsp yeast in lukewarm water (a drop feels comfortable on the back of your wrist) and let it stand for 10 minutes or until frothy. 
In a bowl, take the flour, 3 tbsp sugar, salt and lemon zest and mix well. Cut the butter and, either using a hand mixer or with your hands, crumble the flour and butter together till it resembles bread crumbs. 
Now add the yeasty liquid and mix everything well with the hand mixer till it comes together and forms a soft yet firm dough. You may add 1-2 tbsp more flour if you find it too sticky. I added about 1 tbsp. Do not overmix. You do not need to knead it like bread dough. It just needs to  come together into a soft but smooth dough. 
Take a clingwrap and cover the dough properly. You do not need to oil it. Refrigerate the dough from 1-24 hrs. I kept it for 1 full day. The dough rises very slightly even though it has yeast in it. 
Take the dough out of the refrigerator and without bringing it to room temperature, cut into 4 blocks. Roll a dough block into a thin circle on a lightly floured surface. You may need some extra flour while rolling as it might become sticky. However, add only to remove the stickiness and do not over do it. Dust any additional flour if remaining on the dough after rolling. 

Now roll in the circle like a mat. 
Cut this rope into 3-4 equal parts and again roll them out to ropes with the to and fro movement of your hands. 
In a plate mix the 1/4 cup sugar and ground cinnamon and keep it handy. Brush the ropes with a little milk and immediatelt roll them on the sugar cinnamon mixture and bring one of the ends on top of the other to form a "tear". Place this loop/tear shaped dough on a baking tray lined with parchment paper. Repeat for the rest of the dough. 
You may use extra sugar and cinnamon for rolling if you run out of it. Roll generously on the sugar mix to get a beautiful caramalized crunchy bottom. Let the cookies rest for 20 minutes while you pre-heat the oven at 175 degree celsius. Take care not to let them rest for more than 20 minutes else you may get more of bread like texture on the inside. The cookies will now look slightly puffed. 
Bake the cookies in the pre-heated oven for 25-30 minutes or until golden on top. For the last 2-3 minutes, you may increase the temperature to 180 degree celsius with only the top rod to get a more golden shade. 
Cool on a wire rack completely before storing them in air- tight containers and enjoying them with your favorite cuppa!!